Blackcomb Buttress

Date: Sept 15, 2016

Participants: Brittany Zenger, Geoff Zenger, Ross Berg (guide)

Difficulty: 5.4

Report: Years ago I was promised as part of a birthday gift that Brittany and I would climb Blackcomb Buttress, but life happened and those plans fell by the wayside.  Then just earlier this week Brittany found out that she could take Thursday off work, and with the weather forecast looking gorgeous the idea came back to climb the Buttress.  There was only one complication: Brittany hadn’t been on rock since a couple months after she became pregnant and going alpine climbing by ourselves for her first rock experience in well over a year didn’t seem like a great idea.  Luckily for us, a friend recommended that we talk to Ross at Altus Mountain Guides and we were fortunate to find that he was free to guide us that day.

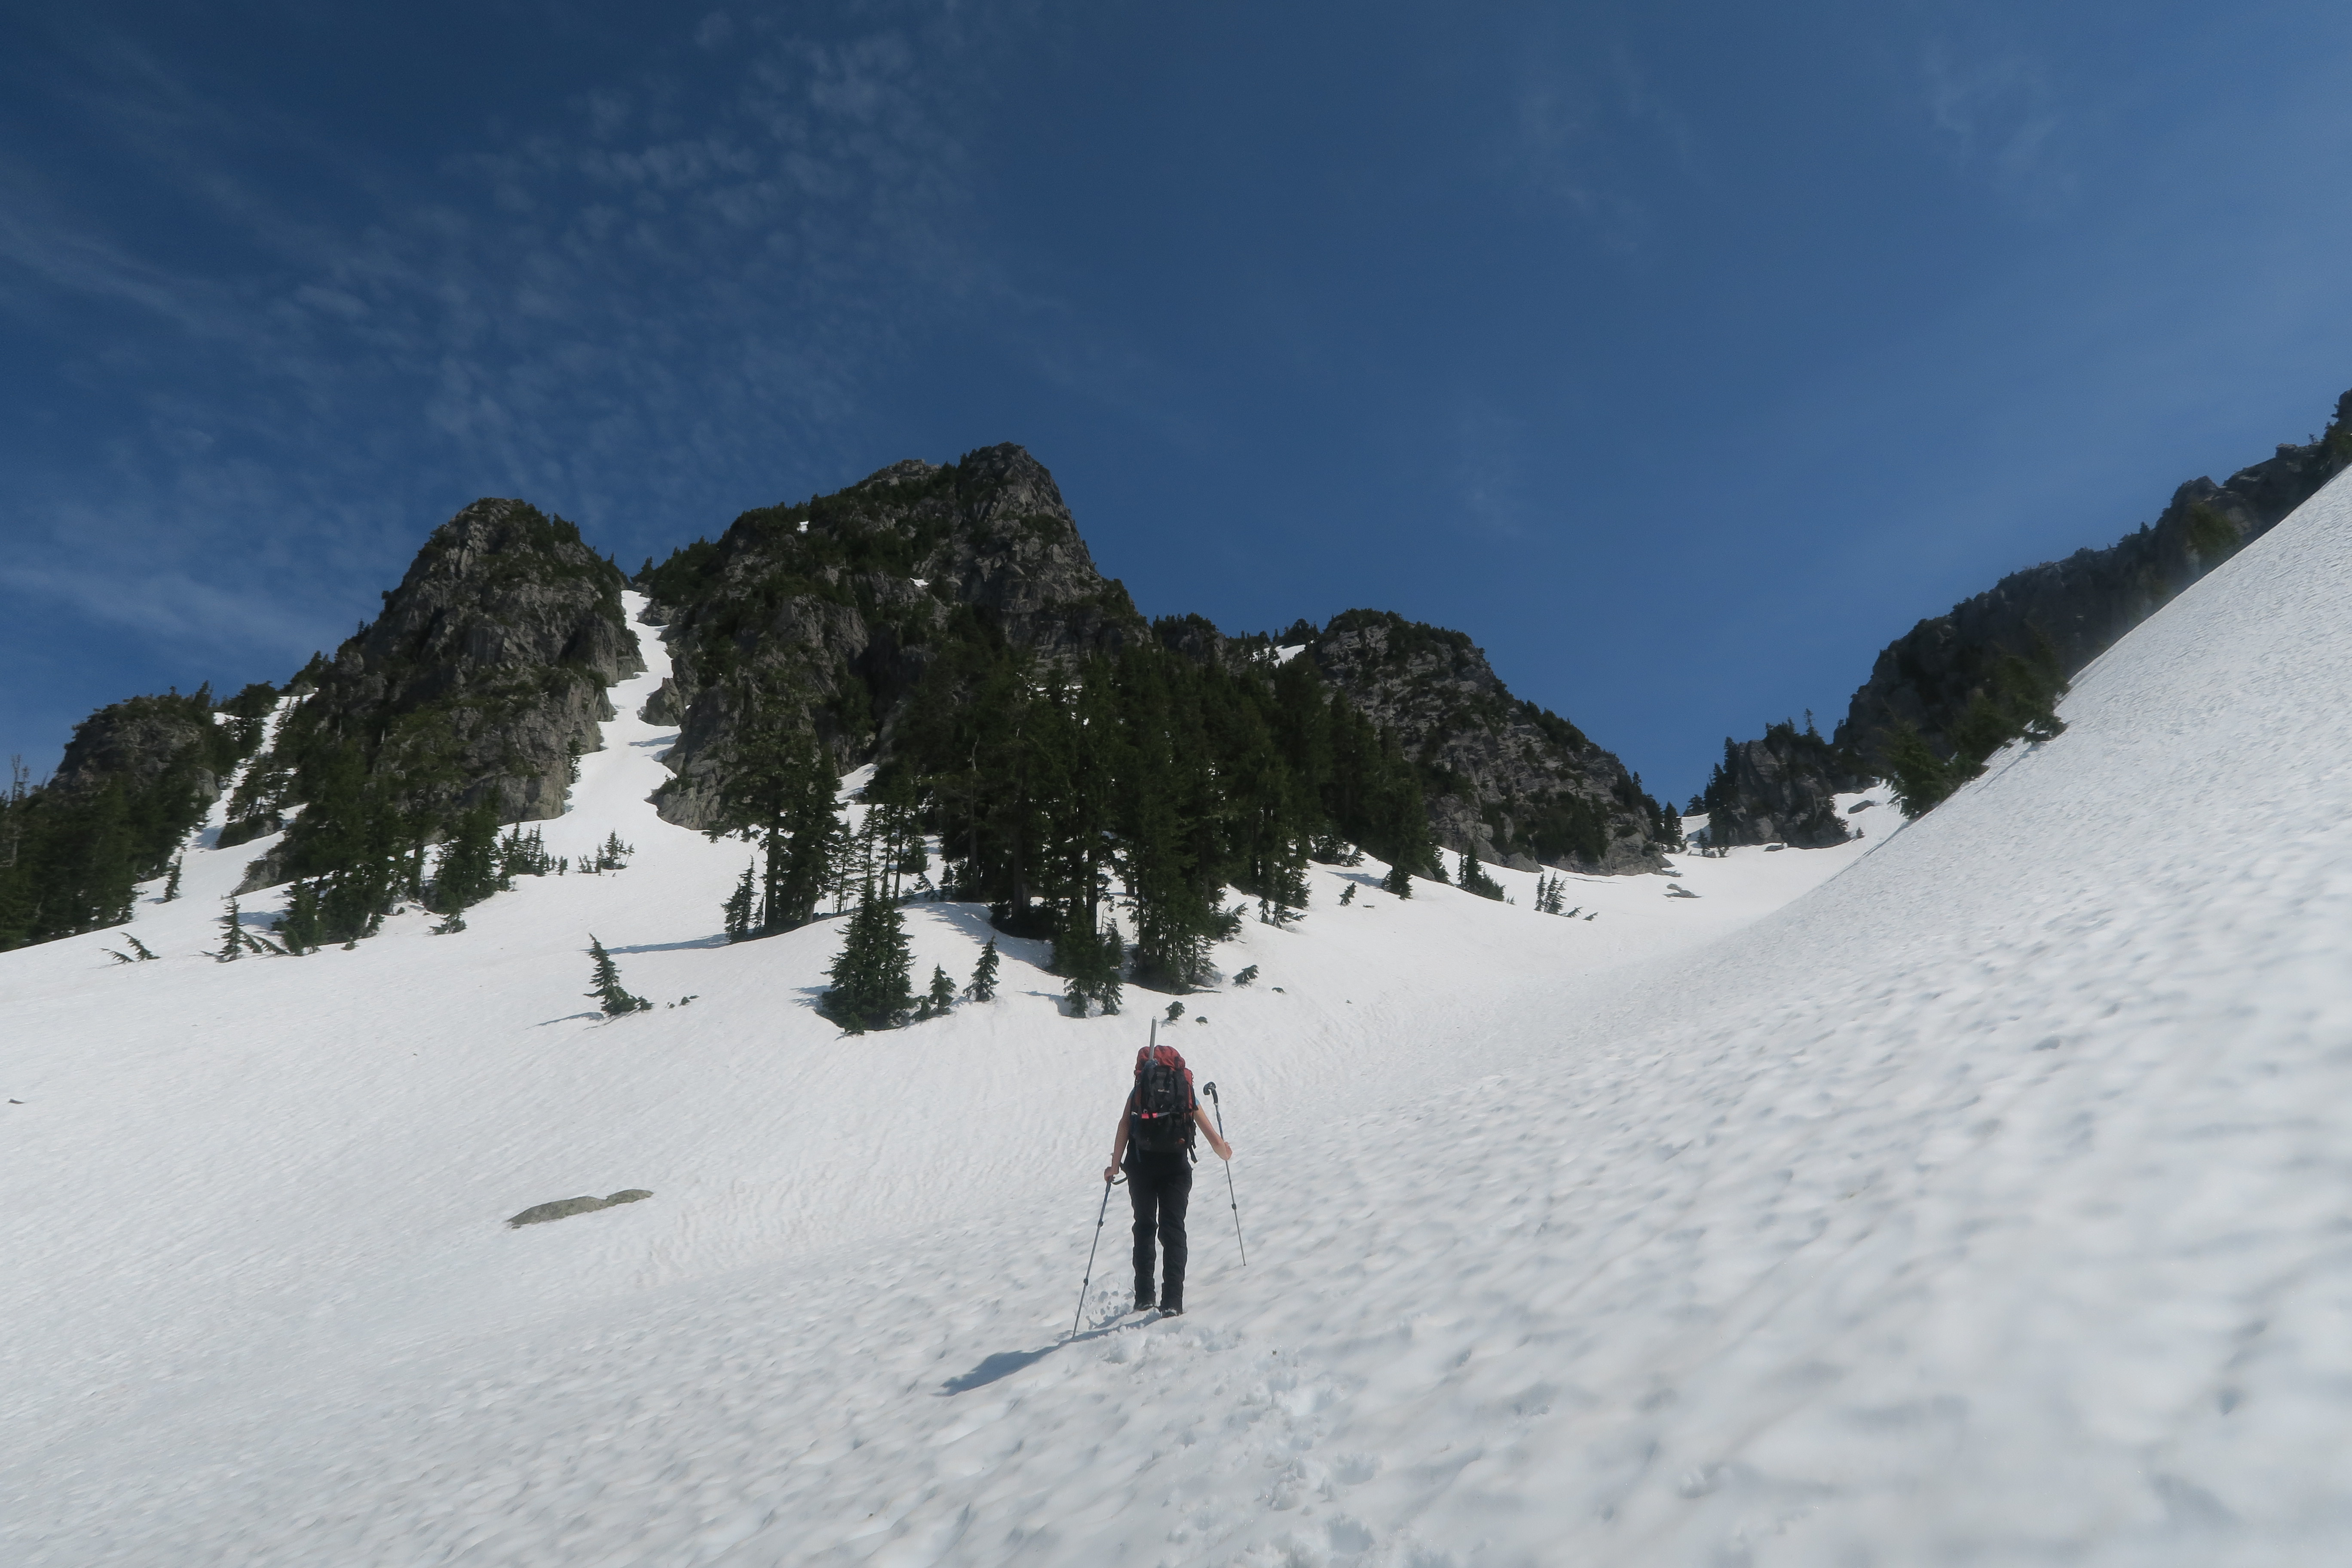
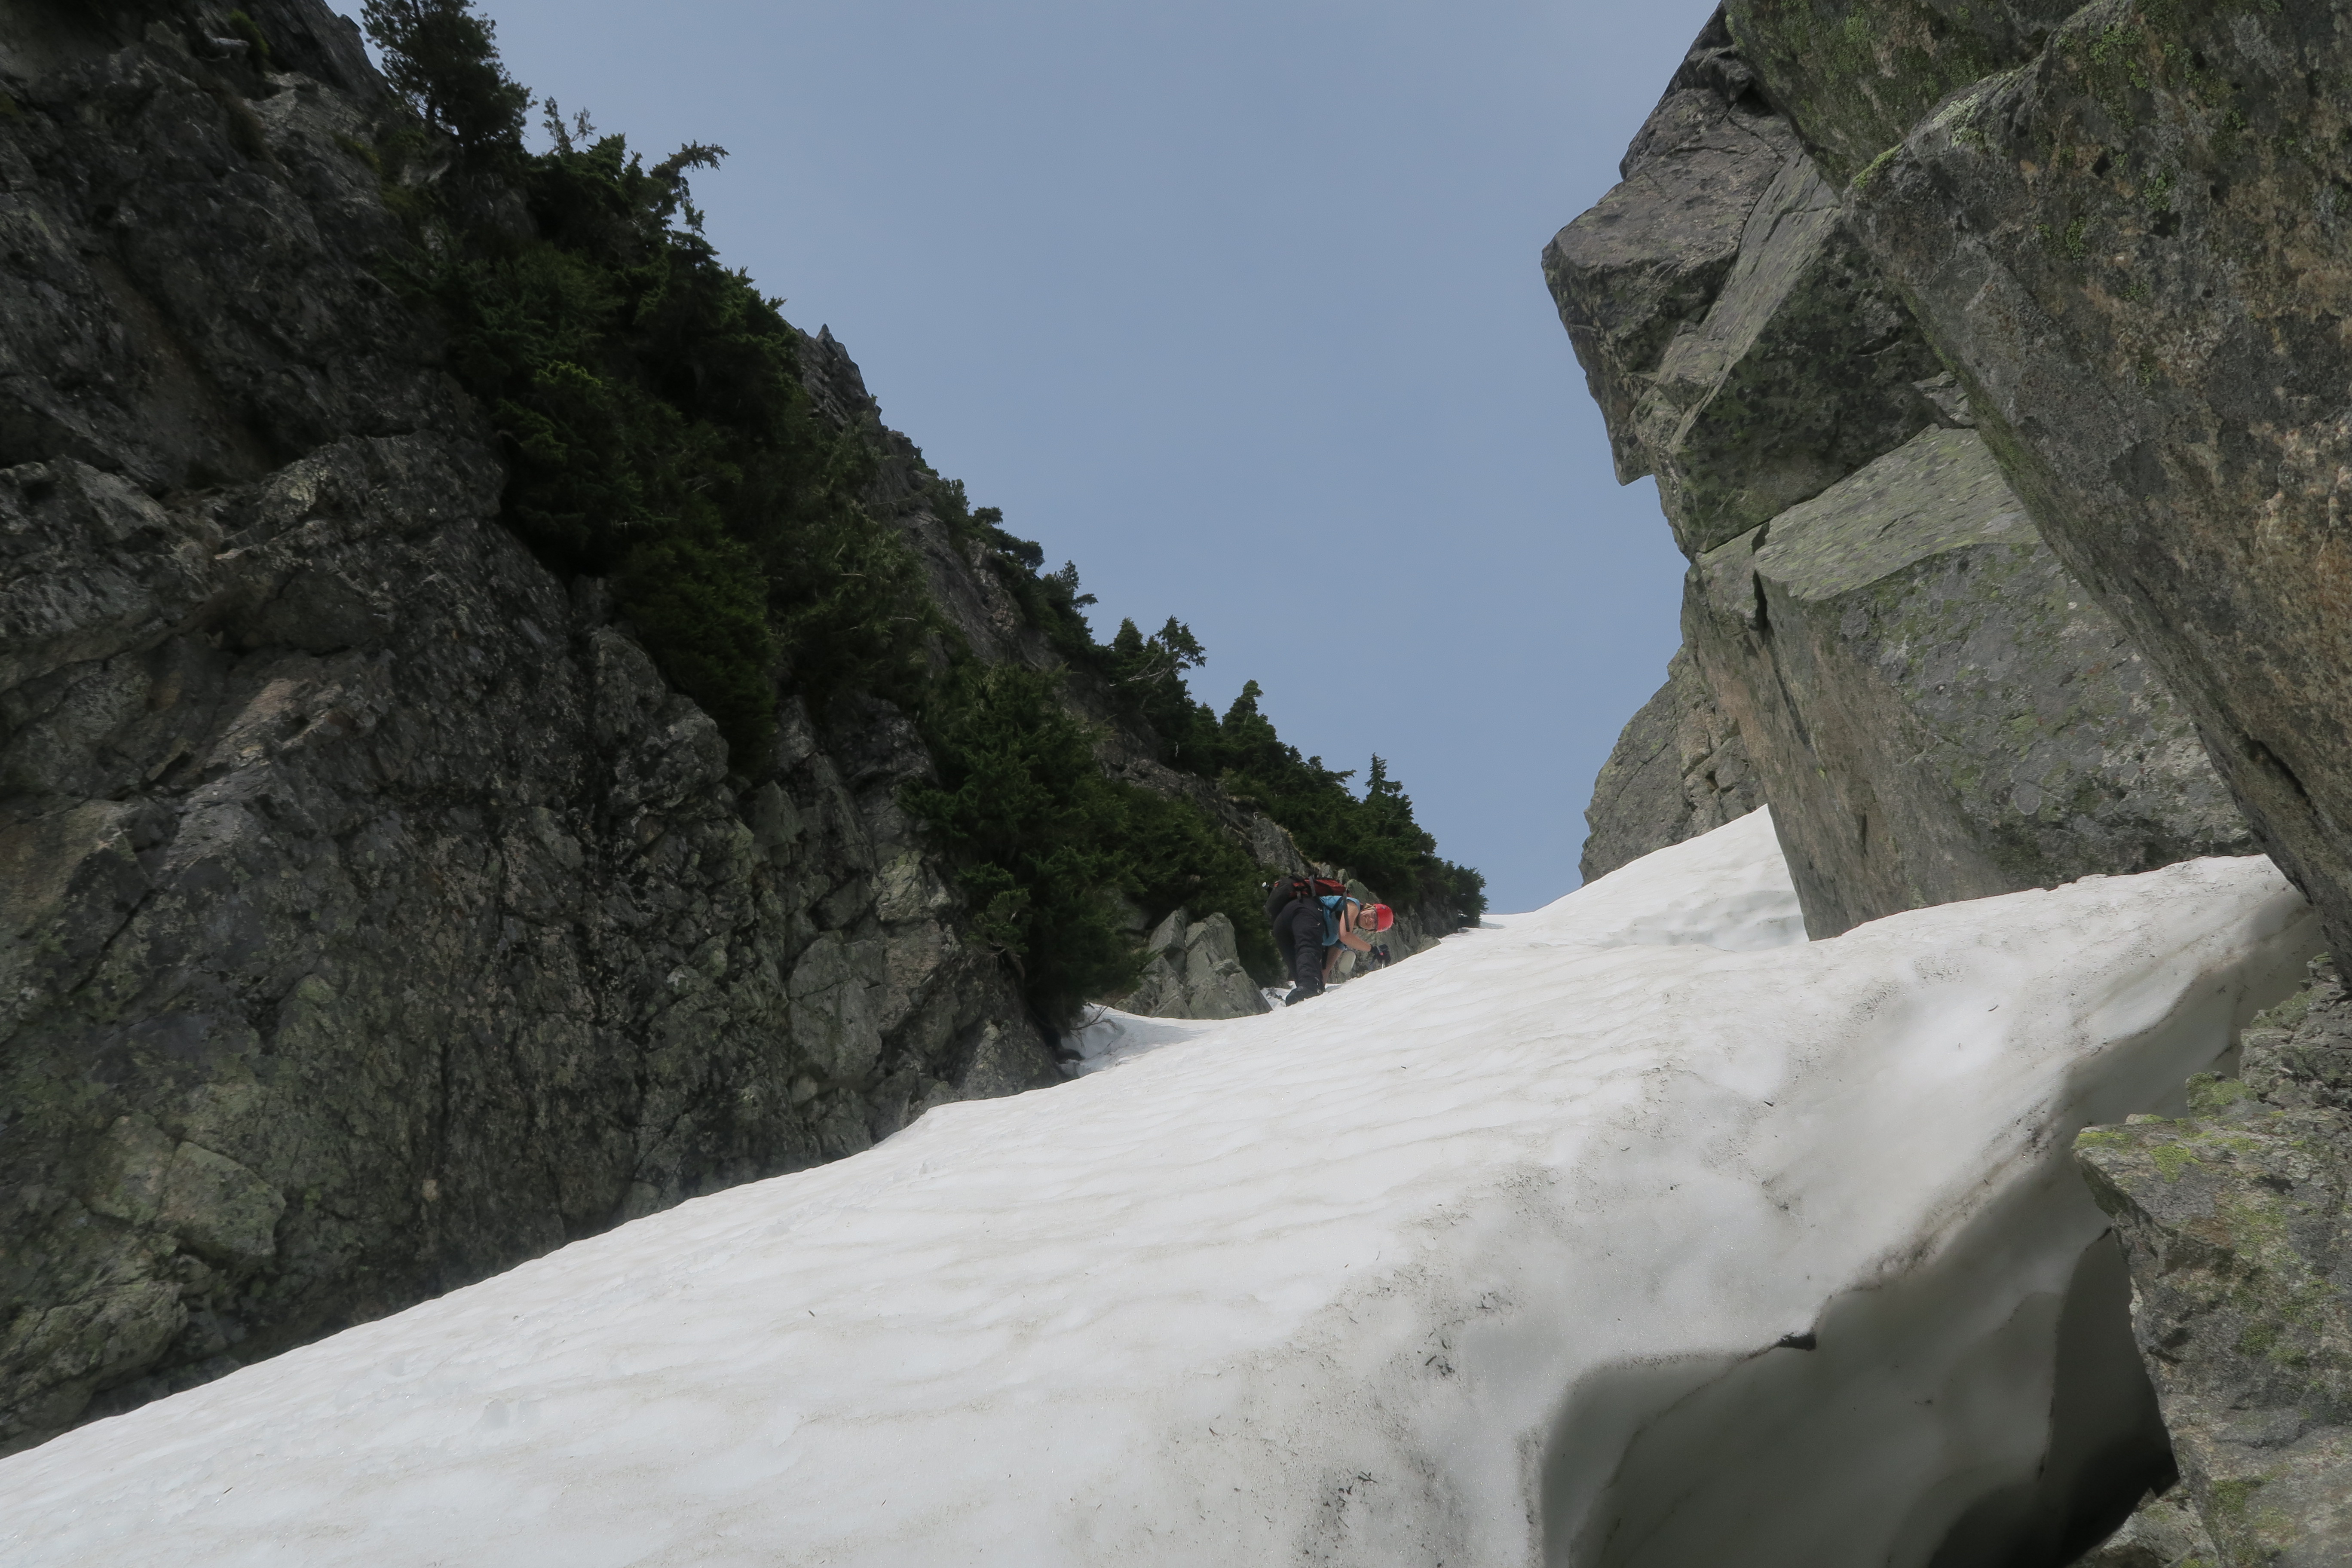
We all met at the base of the Whistler gondola just before the lift opened at 10, and after a quick gear check, we rode the gondola up and then took the peak 2 peak over to Blackcomb, arriving on Blackcomb just before 11.  It was a short 30 or 40 minute hike over to Lakeside Bowl, where we ate a snack, sorted out a bit more gear, and started making our way up below DOA towards the Buttress.  From below it looks like you’d have to go through some steep loose terrain to reach the Buttress, but by wandering left and right of the main gully it was possible to ascend to the base of the climb on reasonably solid rock for the most part, and reached the base of the route a bit before 1pm.

As an aside, although the forecast that morning had been for sun, the alpine high had been forecast to be around 8 or 9 degrees and I had chosen to wear a long sleeved shirt.  In reality however, the alpine temperature hovered around 20 degrees and with no breeze to speak of I was hot all day.  That said, I can’t really complain about a beautiful warm alpine day in mid September!

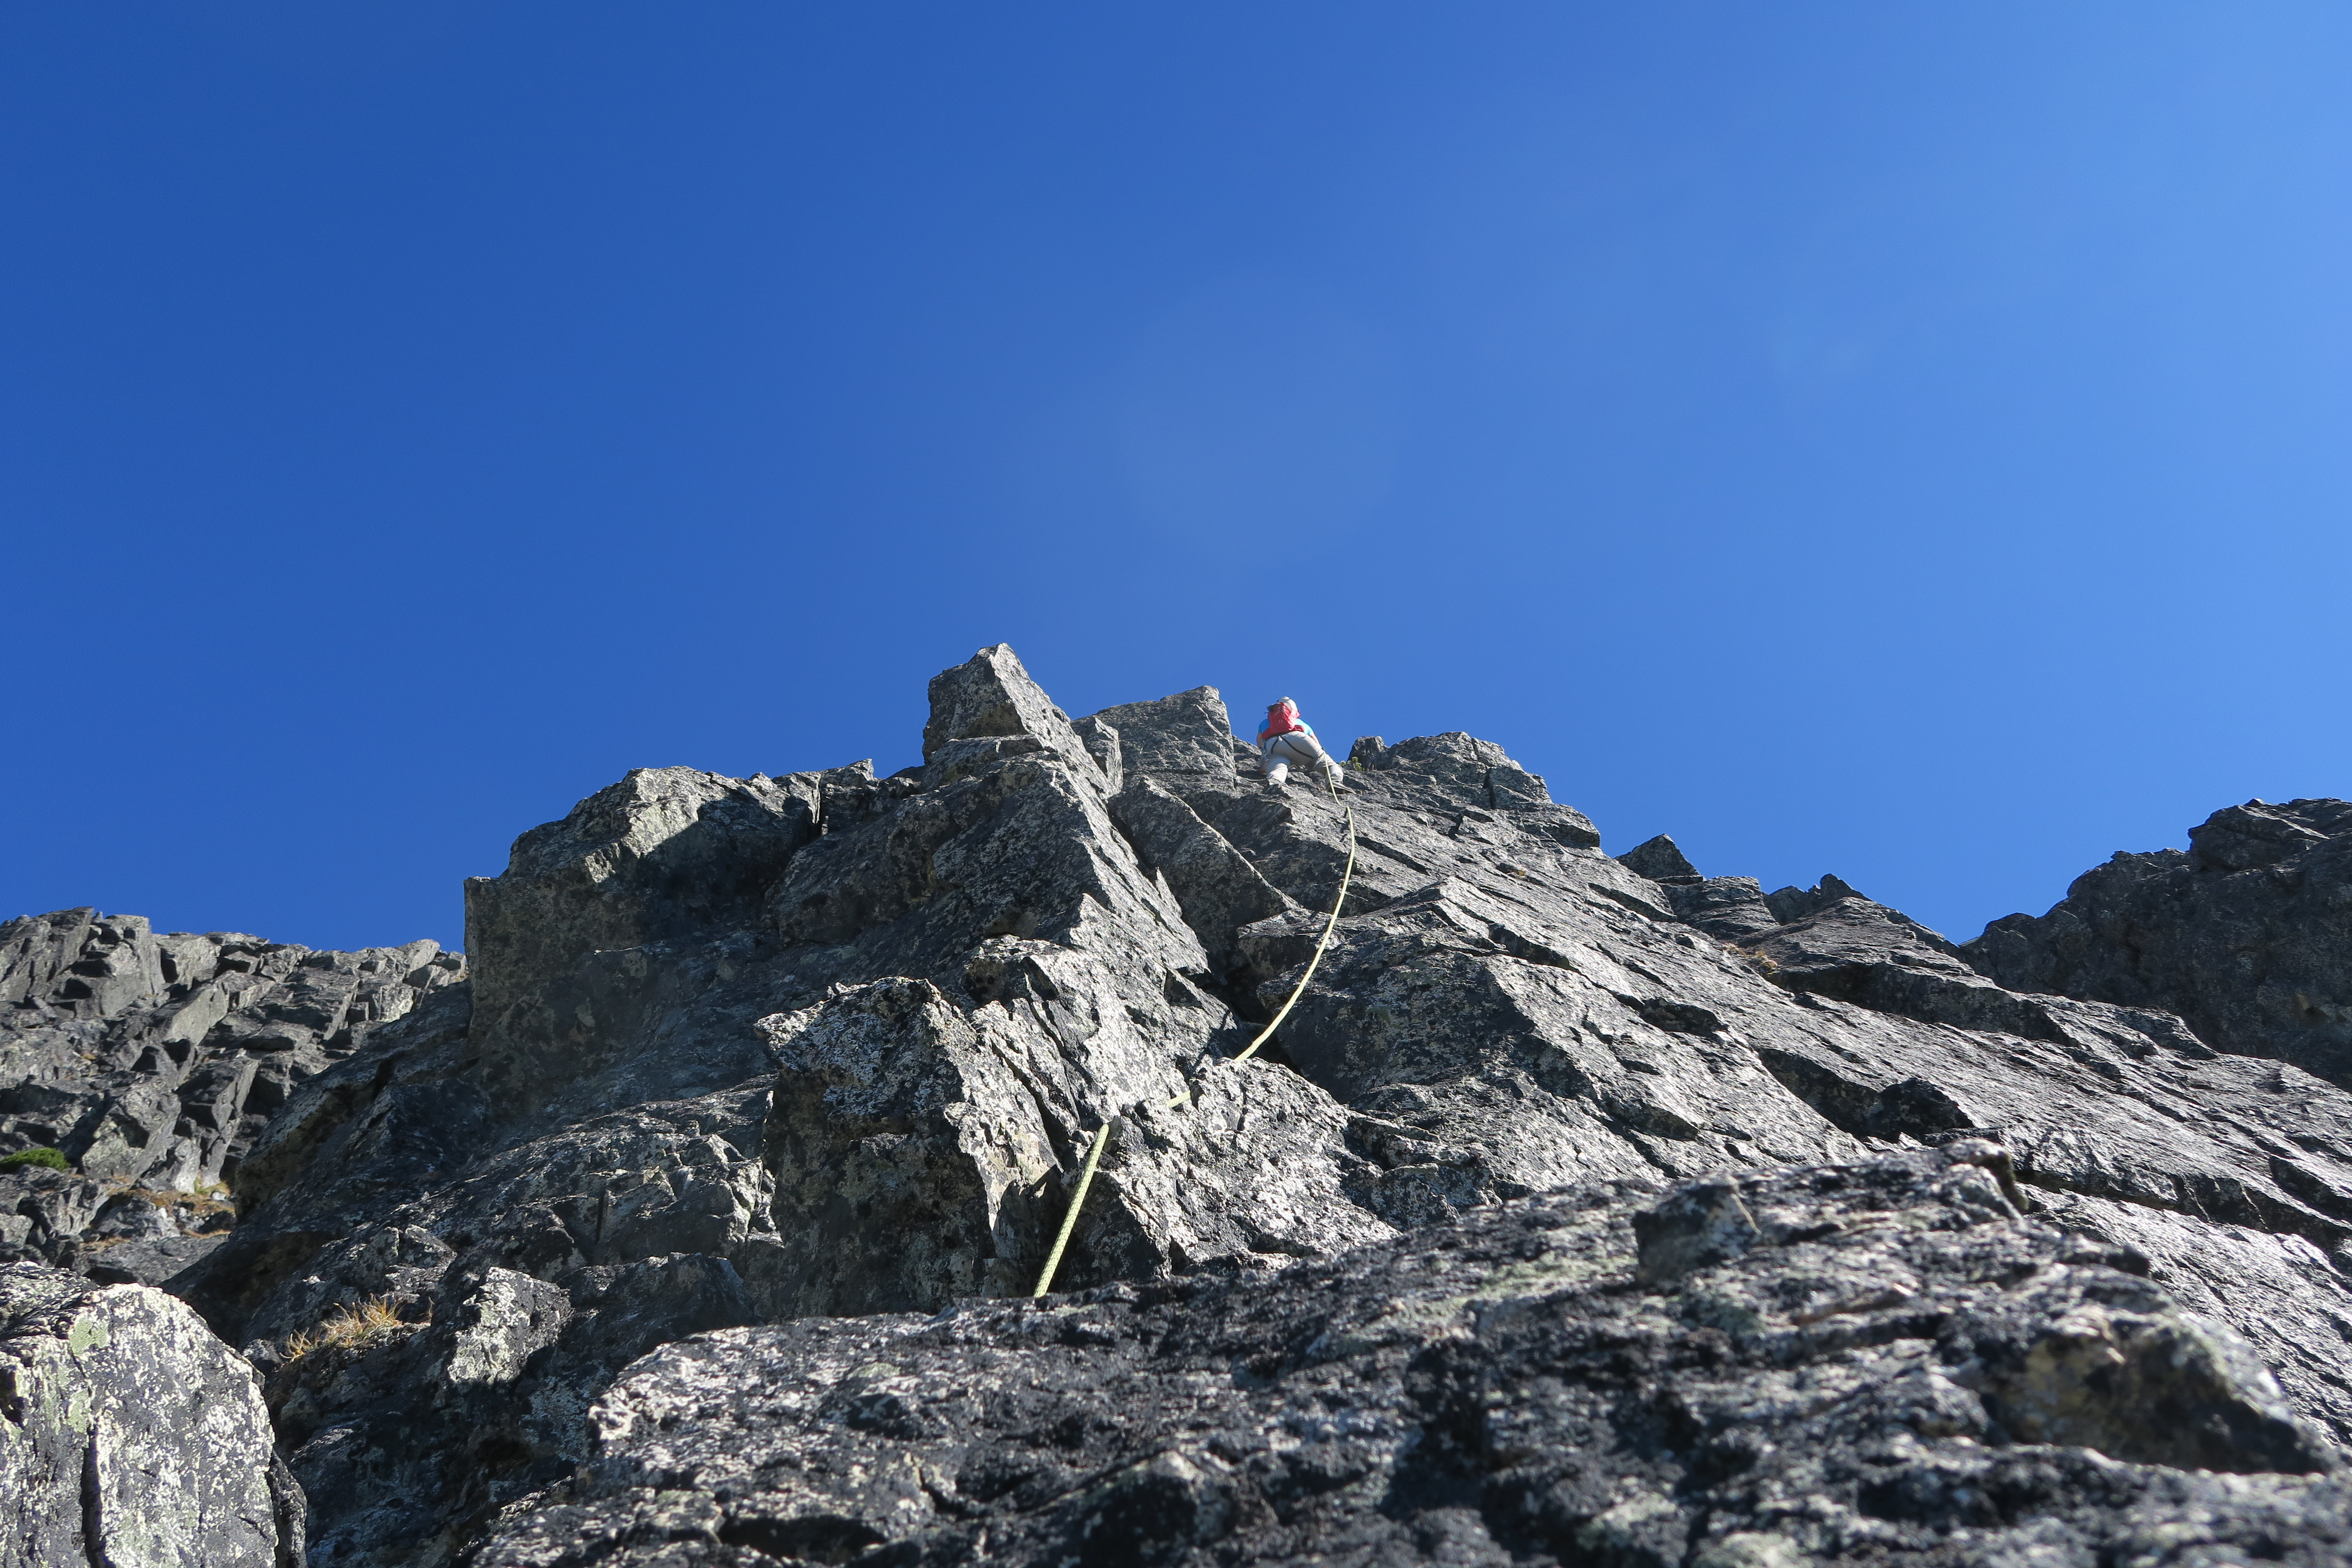
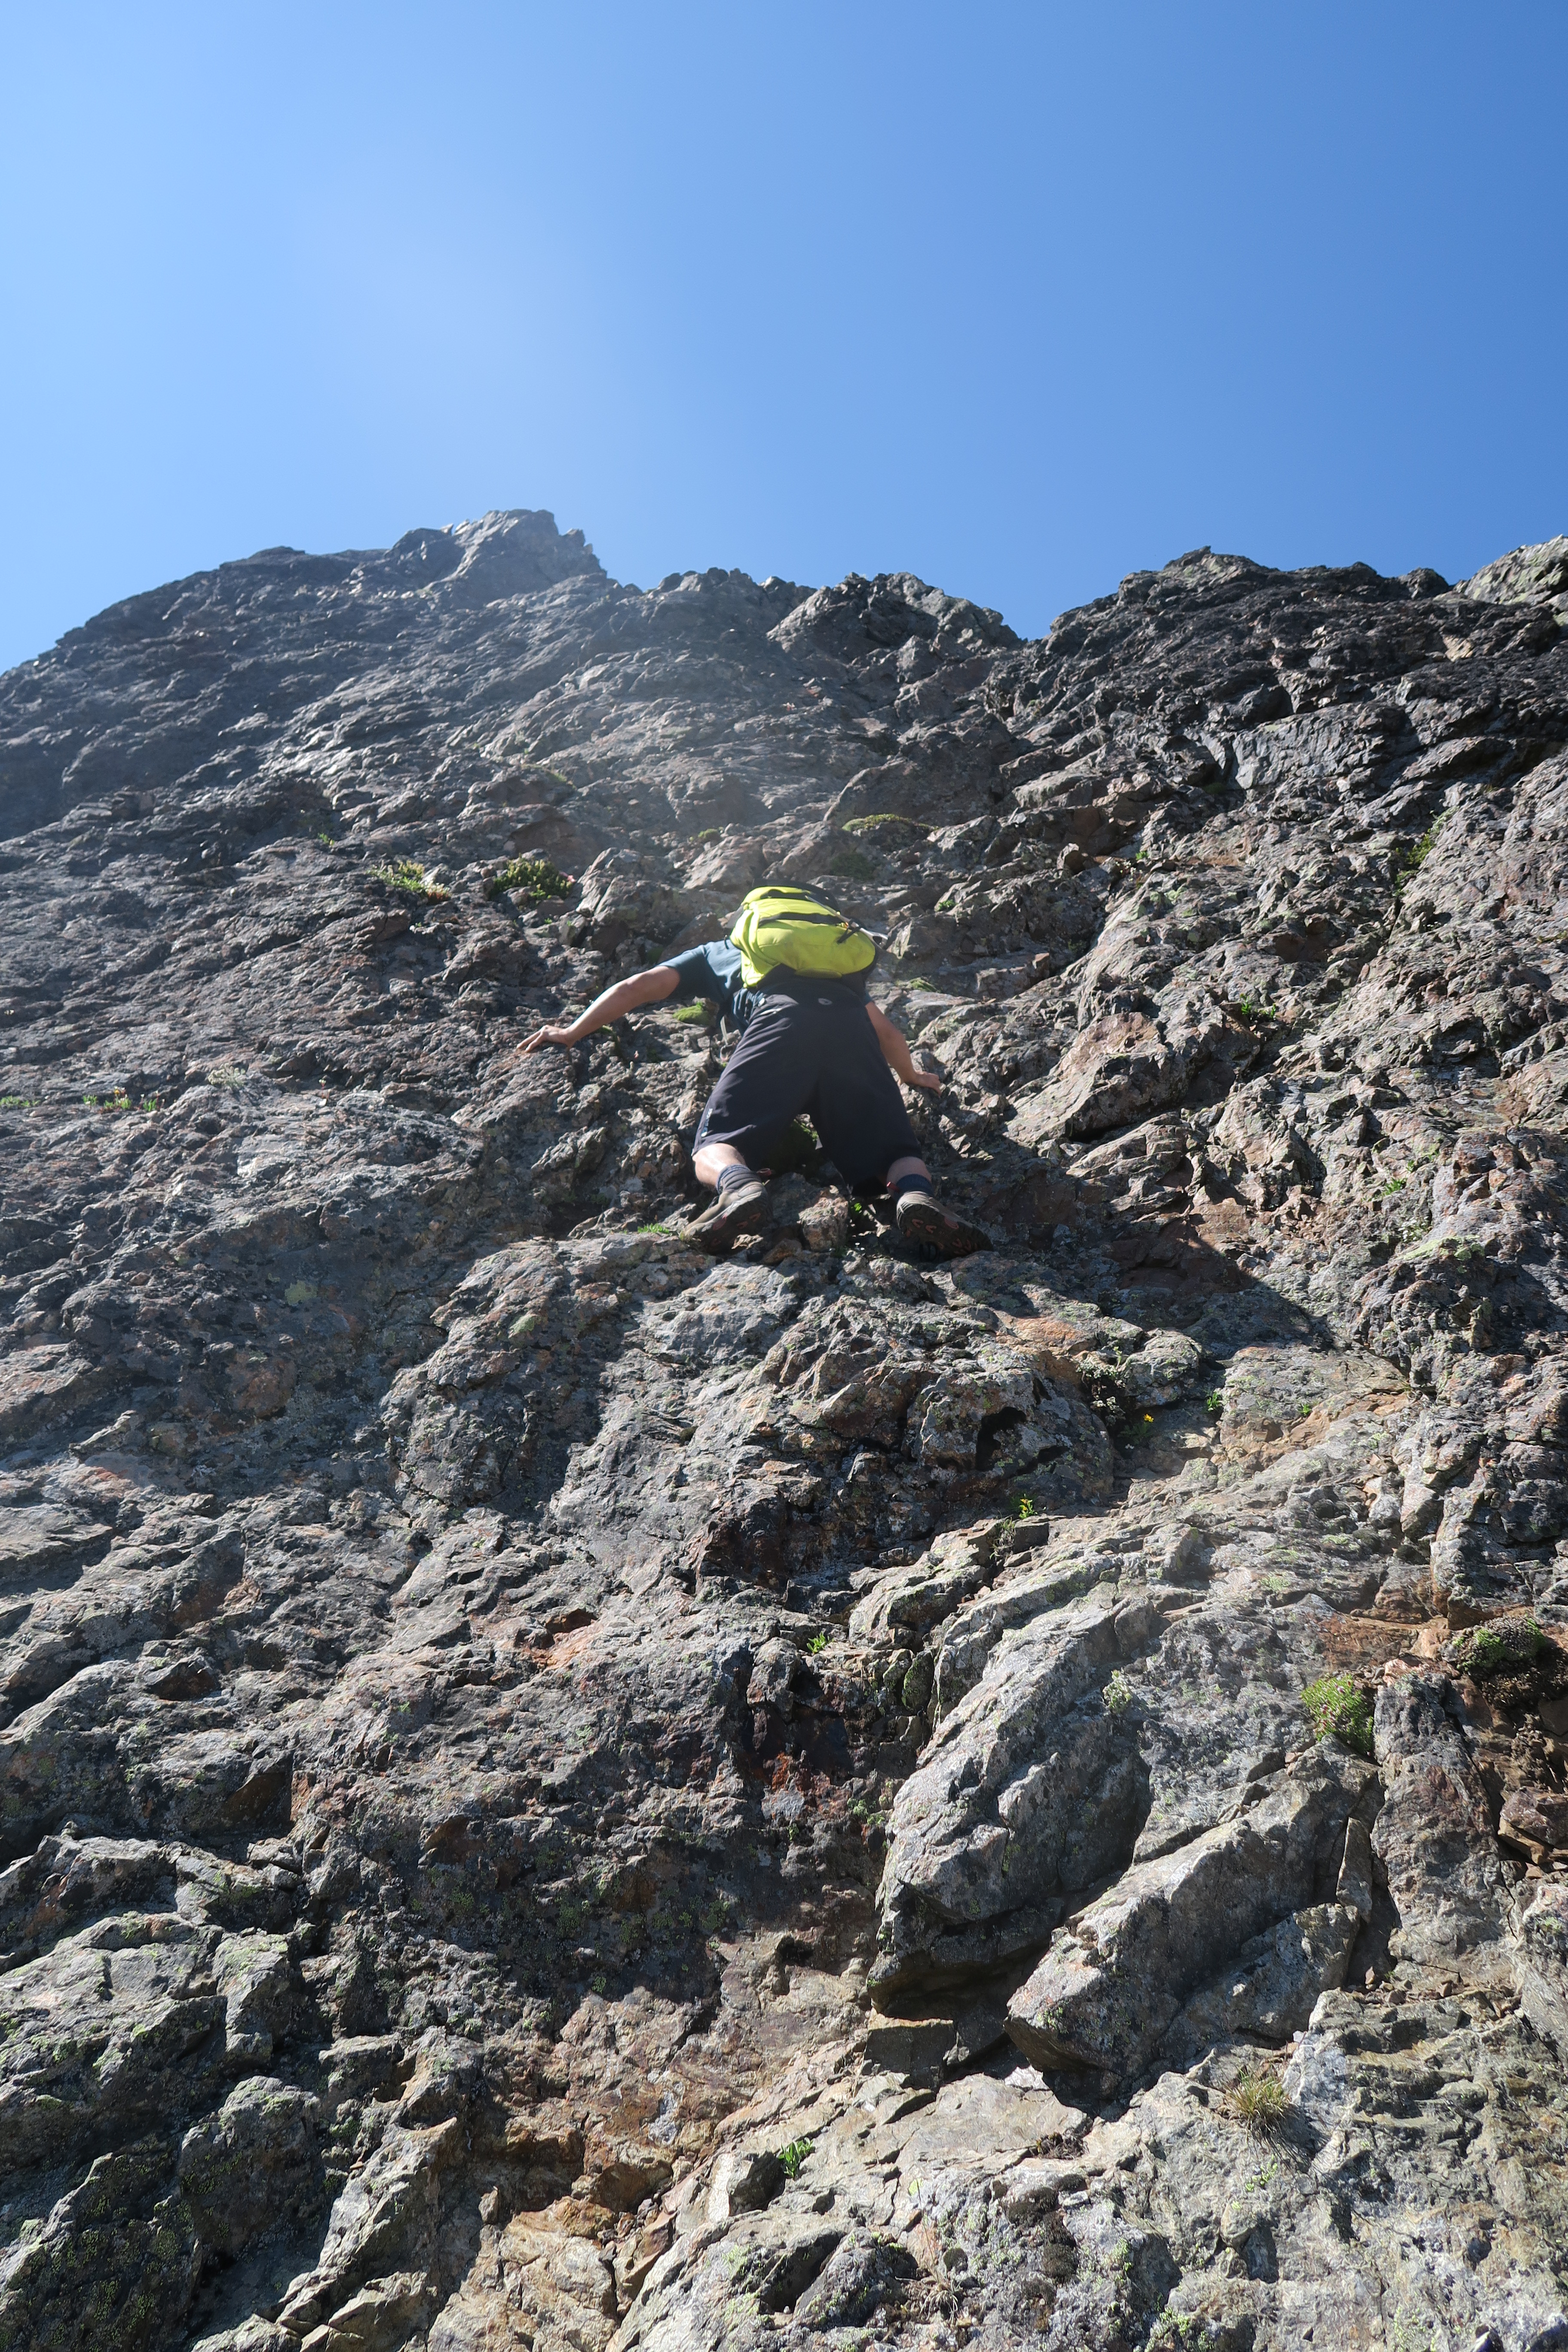
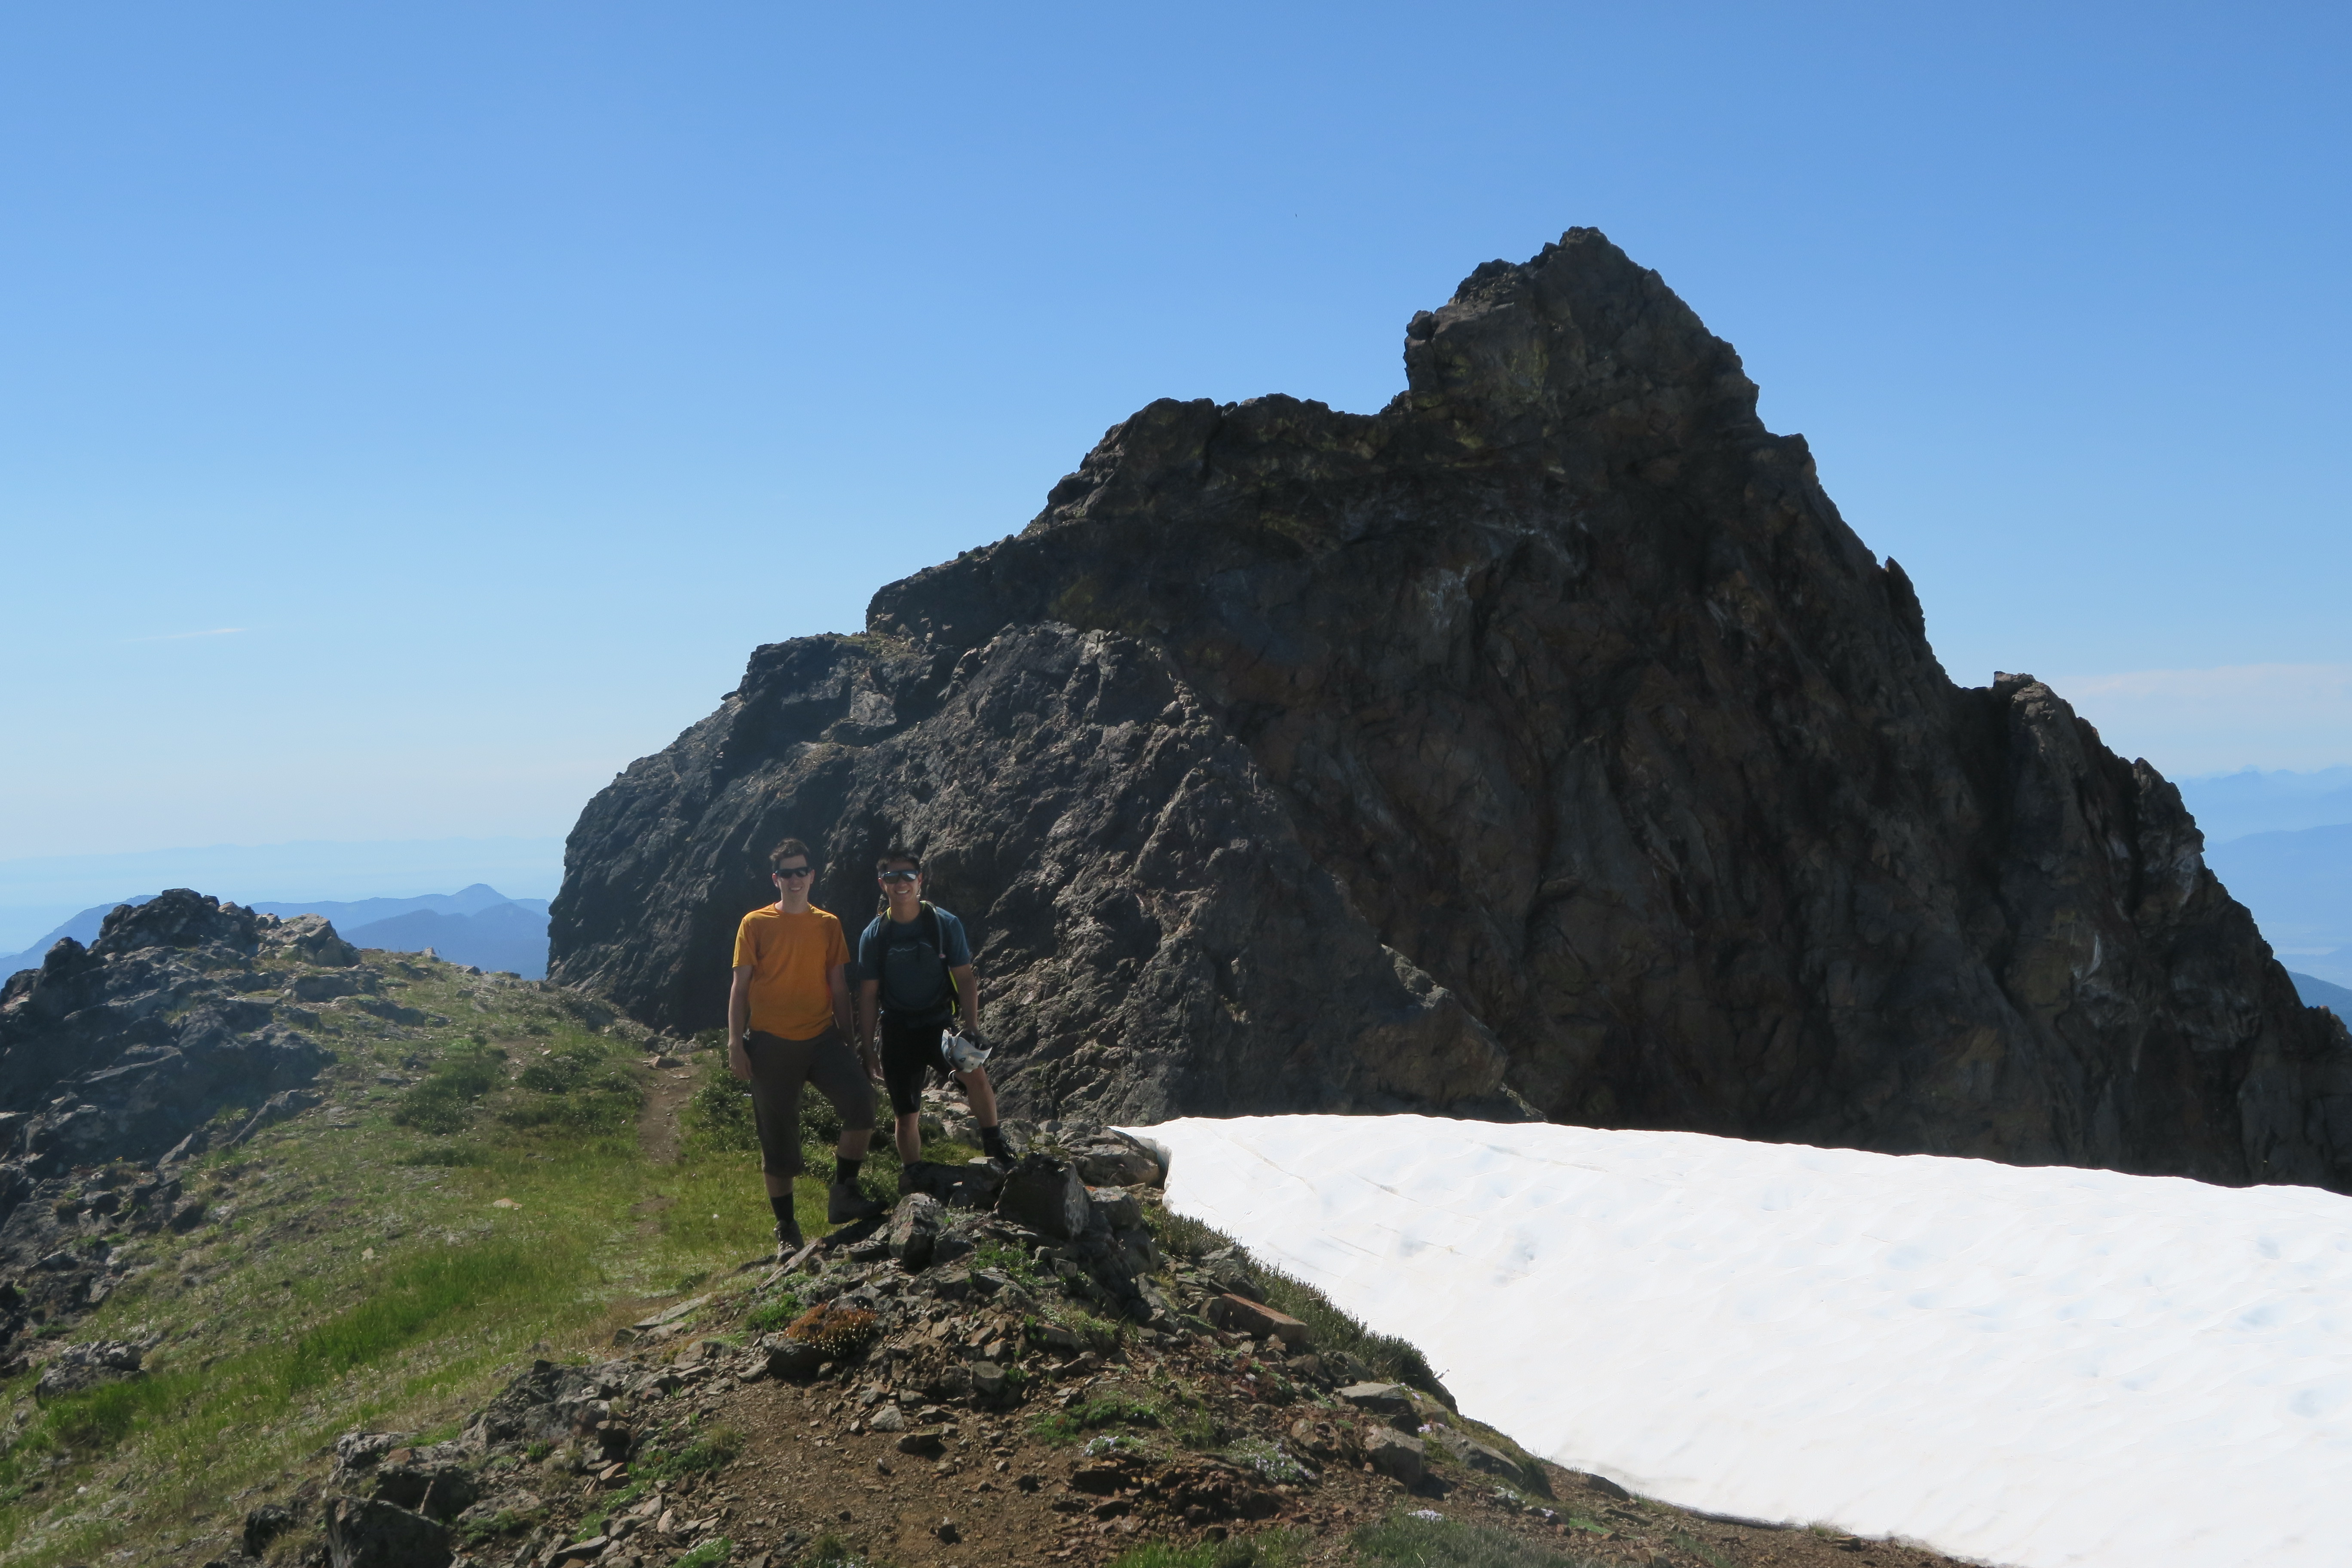
After another snack and gearing up to go, it was time to climb!  We chose to climb the main rib of the lower buttress (not the optional left rib mentioned in Alpine Select).  The route started out steeper than I expected.  Just a couple weeks earlier I’d climbed Pigeon Spire’s West Ridge, which like the Blackcomb Buttress is also rated at PD (5.4), but comparing the two routes shows how neither the YDS or Alpine grade can fully capture the character of a route.  Whereas Pigeon was essentially a long super-exposed scramble above glaciers, almost entirely at very moderate angle, Blackcomb Buttress is a much shorter, steeper, and significantly less exposed.  Also for comparison, while Blackcomb Buttress seemed quite stable and very few rocks were moving on us, it is still quite fractured terrain whereas Pigeon is almost Squamish quality granite.

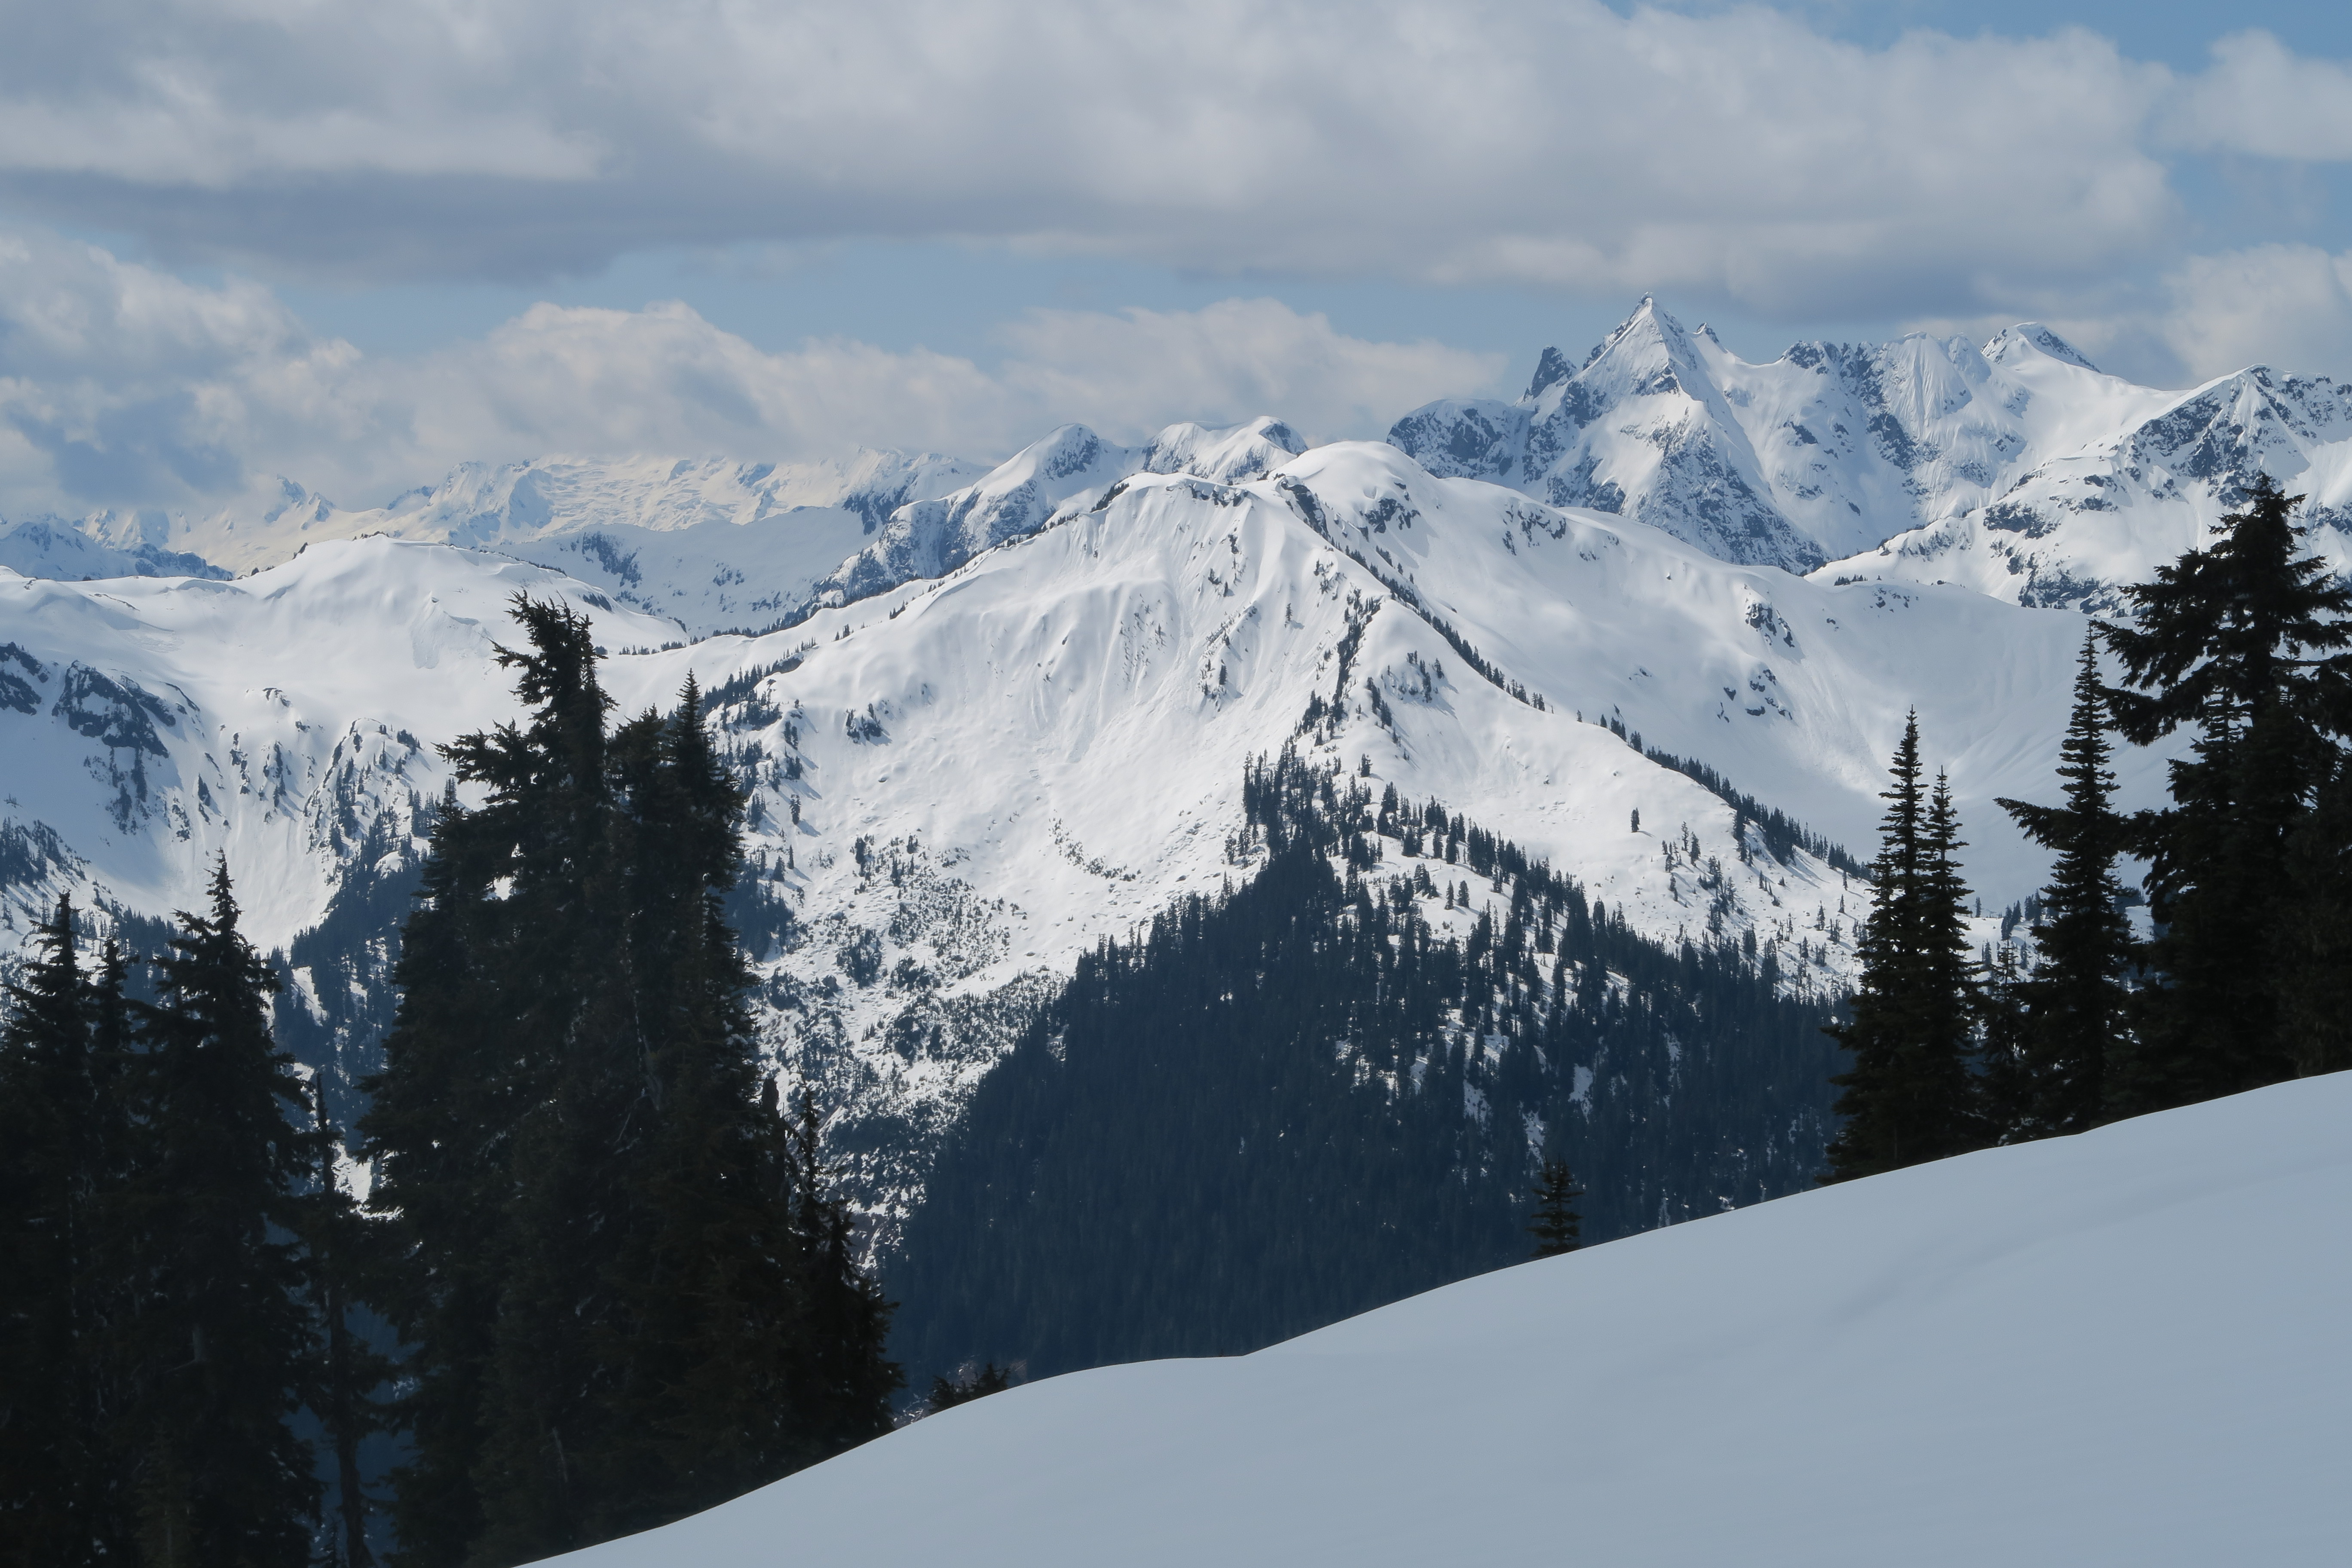
The first rope length was quite steep and due to Brittany being approximately 20m ahead of me on the same rope and out of sight from me, it felt a lot like free soloing with a rope only for catastrophe prevention.  That said, the moves themselves were easy, and higher up the angle kicks back as the route wanders up through blocky terrain with generous belay ledges to be found whenever needed.  We climbed the route in 5 or 6 pitches, and about 90 minutes from when we started were on the summit of Blackcomb Mountain.  The weather was perfect, as were the views.  It had been many years since I’d been on Blackcomb in the summer and it was great to see a summer view of the Spearhead range from that side of the valley, in addition to the great views of the Tantalus group, Cayley group, and Mt. James Turner area.

Following an extended summit lunch break, we set off at about 3pm to head first towards Decker, then down body bag bowl and around Blackcomb back to Lakeside bowl where we would regain the trail system.  At this time of year, the last gondola ride back to Whistler departs at 5:15 and so we had no time to dawdle.  It took us about an hour and a half to work down the talus fields to the trails, but with a bit of hustle in our step it was only 30 minutes from there back to the peak 2 peak gondola, which we reached with 10 minutes to spare!  Total gondola to gondola round trip time was just a few minutes over 6 hours.  Without a doubt this was the shortest round trip time I’ve ever had for an alpine climb.

In all, this was a fantastic day out in the mountains.  I’m super happy to have made it out alpine climbing with Brittany this year and to have found a very enjoyable route to boot.  This was certainly my least stressful alpine climbing day ever.  Many thanks as well to Ross for coming out with us, showing us the way and keeping us safe.

Continue ReadingBlackcomb Buttress

Capilano Mountain

Date: July 1, 2016

Participants: Steve White, Geoff Zenger

Difficulty: 2 (hands needed for a few short steps, easy snow)

Report: A promising forecast for Canada Day led me to post a trip on the BCMC schedule and look for some company to join me on an excursion up Capilano Mountain.  I lucked out and Steve volunteered to join me, but we both ran out of luck when the forecast turned out to be dead wrong and we spent most of the day in the rain and fog.

The gate at the bottom of Phyllis Creek road is permanently locked, and so we parked in the pullout right below the gate at the edge of Furry Creek golf course, and by 8:10 we had our bikes good to go and started up towards Capilano Mountain.  The road was easier than I remembered driving years ago, and we only had to push the bikes up two short hills en route to the turnoff to Downing Creek road, which would take us to the Beth Lake trailhead.  Route notes: on Phyllis Creek road, take a right at the first fork and always follow the most well used path up to the turnoff, which is just before the 4km marker, not just past as Matt Gunn’s guidebook indicates.

About 100m after turning on to Downing Creek road, we crossed Phyllis Creek, and the road began to deteriorate as the alder encroached on the path.  A few hundred metres later we started to encounter lots of small windfall, and about 500m from the turnoff we gave up on the bikes and left them in a ditch.  This proved to be wise as the road became increasingly overgrown from this point and bikes wouldn’t have helped at on all the descent beyond this point.  As a result, we had to travel the remaining 2.5km to the old Beth Lake trailhead on foot.

The first 0.5-1km of the trail up to Beth Lake is badly overgrown with a variety of bushes, including devils club and plenty of blueberries.  Making matters worse, the skies had opened and by the time we reached the older growth above we were thoroughly soaked.  We persevered nonetheless.  At this time the trail is easy enough to follow, although it won’t be too many years until the trail becomes a challenge to hike unless someone heads up and clears the trail up to the old growth.

We reached Beth Lake at around 11:00, and as we stopped for a quick snack and drink, the clouds descended and we had our first experience with the fog that would engulf us until we reached our bikes again later in the day.  From the lake, the trail is a bit of a mess for the first 10 minutes as it traverses onto the ridge to the west of the lake, but soon improves and until we reached snow at around 1300m it was in good shape.

Above treeline the route is fairly well marked with cairns and we had little difficulty following it until near the col west of the summit (south of Gordon lake), but as the fog became even more dense, we had to check a GPS route a couple times to determine the right way to proceed.  The summit block itself was quite easy to ascend, mostly on snow except for a steep step near the summit where we moved onto the rocks and heather to the side of the gully.  We reached the summit at about 1:50 and were treated to glorious views of fog and more fog.

In the fog we started down the summit in the wrong direction, but noticed our mistake quickly and found our tracks in the snow to follow back down.  The descent down to the bikes was aided greatly by the snow and we were back down at the lake in what seemed like no time.  From the lake down to the bikes was an annoying combination of bush and logging road walking, but once we reached the bikes, all was better.  There are few experiences in life I enjoy better than coasting down a logging road on a bike at the end of a long hike, revelling in the thought that some poor souls have had to suffer the long logging road descent on foot.  The bike descent was fast and fun, and soon enough we were back at our vehicle, just in time to witness the skies begin to clear.

Thank you very much Steve for joining me on this adventure.  There were no views, and the conditions weren’t great, but at least Capilano mountain has been bagged at last.

Total ascent time: 5 hours, 40 minutes.  Total descent time: approx. 3 hours.


Continue ReadingCapilano Mountain

Mt. Hanover

Date: May 14, 2016

Participants: Radmila Bridges, Geoff Zenger

Difficulty: 3 (snow to 40 degrees, some scrambling moves)

Report: Another month, another chance for an adventure.  With a baby at home I have to be more selective than I used to when it comes to getting out these days, and it gives me incentive to pick destinations closer to Vancouver to minimize travel time.  There aren’t many significant peaks near Vancouver that I haven’t climbed, but one notable exception was Mt. Hanover and so I posted a last minute trip on the BCMC schedule to try and find a couple people to head up Hanover with me.

Saturday morning we drove up to the Porteau Rd turnoff on Hwy 99 and seeing that the gate was open to the upper Deeks Creek trailhead, we drove up.  The road is in pretty bad condition in a few places with quite large loose rocks and deep grooves, but the Jeep survived the ascent and we quickly shaved off 3km of boring logging road hiking from the day.  I don’t know how much longer the road is going to be in driveable condition with a regular 4wd that has not been jacked up, but for now it goes.  We parked at the so called “upper parking area” at about 7:50, and shortly after 8, walked up the road another few hundred metres to the “upper upper parking area”, where the trail begins.  In theory someone could drive up these final few hundred metres, but I was not willing to risk in my jeep.

The trail to Deeks lake is in excellent condition, with only a couple minor pieces of deadfall to contend with and we reached the lake at 9:20am and stopped for our first break.  Deeks lake is larger than I thought it was, and there are a couple nice camping spots by the lake.  Nonetheless, we didn’t wait there long and soon turned right, crossed the logjam at the exit to the lake, and continued on the Howe Sound Crest trail around the lake and worked our way through pleasant terrain up towards Hanover Lake.  The creek was running high at the place where the trail crosses to the east side of the creek, but luckily there was a large nearby snow bridge that we used to cross.  At Hanover lake the trail gave way to snow, and above the lake we missed the place where the trail crosses back to the right side of the creek, but it was no problem because at the exit of Brunswick lake there was another logjam that was easily crossed, and just past 11am we were at the Brunswick Lake emergency shelter, where we stopped for our second break of the day.

From the emergency shelter, we followed the HSCT markers towards Hat pass until the terrain became open and there was an obvious location to contour to the left onto a bench and start heading towards Mt. Hanover.  Below Mt. Hanover the snow was mushy and slowed our progress, but we steadily ascending up until the notorious two gullies on the south / south east side of Hanover came into view, and we found ourselves below them at around 12:30.  In summer conditions the left gully is reportedly much easier than the right gully due to some difficult scrambling moves required to get around two chockstones in the right gully.  However, in mid May conditions, the left gully was an alternating mix of rock and snow patches with a few difficult looking gaps in the snow, whereas the right gully appeared to be snow filled completely and so we took out our ice axes and started up the right gully.

Not far up the right gully we encountered a significant moat in the snow at the first chockstone, a few metres deep, but not terribly wide, and we were able to bypass it on the right via a few easy scrambling moves on the rock.  Above this it was steady step kicking all the way up to the summit (soft enough to not need our crampons), which we reached just past 1:30.  The gully varies in steepness, but about 2/3 of the way up has a sustained section of 40 degree snow that, while not hard, was somewhat stressful due to the big hole 3/4 of the way down the gully that loomed below us.  It eases off a bit below the summit, and the gully tops out on the literally a few metres from the true summit.  We spent a few minutes taking photos on the summit, and the crossed back over the top of the gully to a nearby subsummit that was snow free and were we could sit on the rocks, eat lunch, and enjoy the views all around.  Total ascent time: 5.5 hours.

The descent down the summit gully was slow as we had to face inwards and carefully follow our steps the whole way down.  At the gap / chockstone, I misplaced one of my poles on the rock and it slipped down into the hole.  Luckily, it landed on a snow lip and I was able to get myself into a position where I was able to fish it out with my ice axe.  That left the chockstone hole unsatisfied and demanding sacrifice, and as Radmila crossed from the rock back onto the snow, she dropped one of her poles into the hole, where unlike my pole it did not land on a ledge and is now waiting to be found by another adventurer.

By 3:15 we were back on the easy snow below the summit block and put away our ice axes.  From here, we motored down nonstop, and reached the car at about 10 to 6, for a total descent time of about 3.5-3.75 hours.  Car to car time was a bit shy of 10 hours.  In all, it was a great early season trip.  I probably could’ve chosen a shorter/easier trip for my first real hiking/scrambling trip of the year, but given my lack of free time it was great to get out and knock off one of the remaining local mountains from my hit list.  Mt. Hanover is quite out of the way, and so I wouldn’t recommend tackling it until someone has already knocked off the more popular local trips (Brunswick, Harvey, Lions, etc), but it is nonetheless a worthwhile outing.  Many thanks to Radmila for accompanying me and providing great company for the day.

Continue ReadingMt. Hanover

Coleman Pinnacle

Date: March 17, 2016

Participants: Rob Janousek, Geoff Zenger

Difficulty: 3.  Easy skiing, but summit scramble sketchy in current conditions.

Report: It’s been a while since I’ve written a trip report.  A trip to Peru, the last few months of Brittany’s pregnancy, selling a condo & buying a house, renovating said house, surgery in December, and the birth of my daughter in January all conspired to limit the number of peaks ascended in recent months.  Nonetheless, a look at the forecast earlier in the week spurred me to book a vacation day and hunt for someone to go on a mid-week trip with me.  I’ve hardly done any uphill in recent months and expected to go for a short tour in the Mt. Baker ski area backcountry, but conditions were good, one thing kept leading to to another, and by early afternoon I found myself standing with Rob atop Coleman Pinnacle.

We set off in Rob’s Delica from my place in Coquitlam just past 6:20am, and after a quick stop at Tim Horton’s we crossed the border at Sumas where there was no line up to speak of and we quickly made our way to the Mt. Baker ski area.  We started skinning from the Heather Meadows base area at about 9am, and made our way up towards Artist Point.  We had been expecting soft powder but to our amazement the whole trip up to Artist Point was atop a thick crust that must have developed on the previous day due to the sun.  Our weather was perfect all day, cool (hovering around or just below zero and nary a cloud in the sky)

The crust combined with an existing track meant that the climb to Artist Point was quick (just under an hour), and from there we reached our main decision for the day, whether to descend to the bowl below us to the east and make an attempt on Mt. Ann or whether to head around Table Mountain and see where we ended up.  Due to the crust we chose the latter and hustled around Table Mountain as quickly as possible in order to minimize our time spent under the south facing avi slopes that had apparently spent their previous afternoon sloughing prolifically.  By 11 o’clock we were on the backside of Table Mountain, where after a few peeks at the map and surrounding terrain to determine that we would be able to return to the car in the evening via Herman Saddle, we decided to ski down the slopes below us and make our way up Ptarmigan Ridge.  Amazingly, behind Table Mountain there was no more crust and the snow from there on was a perfect powder on top of a good base.

The ascent of Ptarmigan ridge from the basin below Table Mountain to Coleman Pinnacle is a superb tour.  It is varied but never overly challenging, at times requiring some routefinding, such as one steep step that was avoided by ducking onto snow slopes on the right and regaining the ridge a little later by skinning up through a gap in the cornice.  A couple hours after leaving Table Mountain behind we were standing on the ridge below the pinnacle with a conundrum on our hands.  On one hand, the summit was so close, but temperatures had risen throughout the day and the direct ascent of the summit from the ridge would have required kicking steps up a snow slope of very questionable stability.  Rob saved the day by noticing a gap in the cornice that we could use to tour around the west side of the peak on steep shaded slopes, which we did, and soon ended up on the ridge just to the SW of the summit.  Here we took off our skis and stopped for lunch.

The pinnacle itself holds some significance for me because it was the destination of one of the two BCMC trips that I had to cancel when I became extremely sick in the Winter of 2013, and I was extremely pleased to be so close to its summit as we finished our lunch.  In good firm snow conditions the ascent of this SW ridge would be trivial, but for us it had a bit of excitement.  The snow to the side of the ridge crest was too sugary to be any good for step kicking and so we ascended the ridge directly on a mix of snow and rock.  Nothing too hard, but slippery enough to keep the blood flowing.  Nonetheless, after a 5 or 10 minute scramble we were standing on the summit with gorgeous views all around!  We were on the summit at around 2pm.

Back at our skis we took off at around 2:30 and we decided to make a slightly traversing descent down the bowl below the pinnacle to the west, making our way down to the basin below Table Mountain, from which we would ascend to Iceberg Lake and up to Herman Saddle.  The ski down was superb with many of the best turns I can ever remember, and with only a couple minor annoyances due to descending a bit too low at a couple points, we made quick time to our low point.  From the low point it is straightforward to ascend up to Iceberg Lake, but was extraordinarily exhausting for me because I was accumulating snow on my skins and I’d forgotten to pack skin wax.  Eventually it hit me that maybe Rob would have some and I borrowed some of his, but by that point my thighs were pumped.  From Iceberg Lake we found a skin track up to Herman Saddle (thank you!), and the route was straightforward yet slow due to my tiredness.

In good conditions, you could probably make it from Herman Saddle to the parking lot in about 5 minutes, but it took us a little longer than that because the horrible crust that we’d encountered in the morning was found once again.  The ski down to the valley bottom was simply terrible and not really any fun at all, but we made it back to the van at 5:30 sharp for a total round trip time of 8 hours, 30 minutes.   Coleman pinnacle is one of the best tours I’ve done and it was only made better by the perfect weather.  Many thanks to Rob for heading down and being great company for a mid-week adventure!

Continue ReadingColeman Pinnacle

Tomyhoi Peak

Date: June 27, 2015

Participants: Alex Le, Geoff Zenger

Difficulty: 3 (solid 3rd, some exposure, never exceeding 3rd)

Report: Saturday was forecast to be the hottest day of the year… what could be a better idea than to do a long day hike with plenty of elevation gain to a beautiful scramble?  Apparently we were the only people who thought this way, as the crowds that I expected to see up at Yellow Aster Butte and Tomyhoi Peak never materialized.  Tomyhoi was one of the remaining “3 star” Matt Gunn routes that I hadn’t climbed, and aside from severe water loss due to the incredible heat (I went through 5 litres of water and was still dehydrated), we had an amazing day.  Tomyhoi is a great scramble in a gorgeous area.

A few delays led us to not leave my place in New West until about 7:20am, and this meant that by the time we hit the border crossing, the line was long (45 minutes), and so we didn’t make it to the Yellow Aster Butte trailhead until nearly 10 o’clock.  Note that the Twin Lakes road has degraded somewhat from the “excellent 2wd” condition described in Gunn’s book.  It could probably be done in most 2wd vehicles, but a few rough sections could make some people being uncomfortable and I was happy to have brought my Jeep.

We set out from the trailhead at about 10 and the day was already terribly hot.  The switchbacks up the initial slope went quick enough, although we had some confusion before the turn off to yellow aster butte.  The guidebook says to “look for a trail that goes off to the left” and at one point we thought we saw a trail heading left, but it turned out to just be a minor spur to a campsite.  The actual trail to yellow aster butte is very well marked with a big sign and obvious when you get there, just minutes before the trail reaches the pass at the end of the valley.  From the turnoff, it was quick going on the traverse to yellow aster butte, and just as we crested the knoll where you see the route down to the tarns and the ridge leading to Tomyhoi itself, it was apparent how amazing the views on the trip were going to be.

From this knoll there are amazing views of Shuksan and Baker, and the ridge from here down to the tarns and up towards Tomyhoi are extremely pleasant and varied.  It took us a bit under 2 hours to the tarns where we had lunch, and from there about 2 hours to wander up the ridge (pushing the pace, really) to the subsummit (with a bit of annoying up and down along the way).  The subsummit is quite nice, but from there the true summit looks very intimidating!

We scrambled down loose ledges to the col between the subsummit and true summit to get a look, and fortunately from the bottom it doesn’t really look so bad.  There’s a groove up to the left, then one from there up to the right, and it’s only from the top of that groove to the top of the ridge (perhaps 8m total) that the going gets quite difficult with decent exposure.  Luckily, this hard part is on the most solid rock of the day and neither of us had trouble ascending it.  For comparison, I’d say that the route is comparable to Sky Pilot, although probably a little easier.  Above this crux, the summit was easy to attain and although it’s a tiny summit, the views from the top were great, with plenty to see in both the US and Canada.  Total ascent time: 4 hours, 45 minutes.  Total water consumed on ascent: 3 litres.

The descent through the scrambling part was challenging for Alex as it was his first true scramble route, but with a bit of guidance and coaching he made it down safely and without too many frayed nerves.  From the subsummit down to the tarns went quickly even though the temperature was still scorching, but a quick dip in the tarns cooled us down and from there it was a tedious and tiring descent back to the car for a total round trip time of about 8 hours, 30 minutes.

In all, Tomyhoi is a fantastic trip and well deserving of the 3 stars that Gunn gave it in his guidebook.  You spend very little time in the trees, so almost the entire ascent is through the alpine, and the trip has plenty of variety including places requiring routefinding and a really nice scramble to top it off!  Sure, I went sweated out at least 6 litres of water over the course of the day, but that just meant that we were lucky enough to be up there on a day where we could have it all to ourselves!

Continue ReadingTomyhoi Peak

Mt. Baker North Ridge

Date: May 28-30, 2015

Participants: Brittany Zenger, Geoff Zenger, John Minier (guide)

Difficulty: 5 (snow and glacier ice to 70 degrees)

Report: As you drive along the Trans Canada Highway from Vancouver to Hope, when you’re passing through Abbotsford Mt. Baker dominates the horizon, and straight in the centre of your view is Mt. Baker’s North Ridge.  This frequent view, combined with both Alpine Select and Beckey’s guide to the North Cascades calling the North Ridge a classic must-do route had led me to gaze at the route for the past few years and want to climb it and return once again to Mt. Baker.

Prior to this trip, we’d only climbed with a guide once before, but given the described difficulty of the North Ridge (extensive climbing on exposed 45+ degree snow slopes and a 30-40m 70 degree ice wall) I sought out a guide to lead us up the route.  I ended up booking John Minier through Mt. Baker Mountain Guides for our wedding anniversary and we lucked out as he is a great guide!  If you’re looking to climb something in the North Cascades I highly recommend checking him and his guiding service out.  They were very helpful in arranging the trip, and he was a great guy to spend 3 days with (even cooked us delicious breakfasts and dinners!).

We began our trip meeting at 7:30 Thursday morning at the Glacier public service centre for a gear check and to divide up our group gear, and once that was done and we’d picked up a hot drink from one of Glacier’s coffee shops we headed up to the Heliotrope Ridge parking lot.  The trudge up to Hogsback was the usual one, but the trail is in good shape, and although the upper rock was already full with a large party, we found a couple nice tent platforms not far below it on a dry rib and were able to set up camp off the snow and on dry land.  Here we had a relaxed afternoon, did an hour or two of mountaineering practice (ice axe arrest, short roping technique, etc), had a tasty dinner, and headed to bed just past 7 for an early rise the next day.

John woke us up at the unholy hour of 2am, and after choking down a few mouthfuls of oatmeal and suiting up, we were set to head out to Mt. Baker’s north ridge by 3:30am.  It took us about two and a half hours to climb up to the Coleman glacier and cross it to the start of the north ridge.  If you look at the route description for the north ridge in Alpine Select, you’ll notice that it suggests two routes: an easier route by going around the ridge to the Roosevelt Glacier and up to the ridge from there or a steeper route straight up through the “hourglass” from the Coleman Glacier, and we took neither.  The Roosevelt Glacier is currently blocked by large crevasses, and the hourglass has a large crevasse blocking all progress.  Instead, we crossed a bergschrund and ascended snowslope about 100m to the left of the hourglass and after two short pitches on steep snow, short-roped the traverse over to the top of the hourglass and from there up to the ridge proper.  On the ridge itself we took a break before ascending up moderate snow slopes to the base of the infamous ice cliff, which we reached at about a quarter to 9.

Looking up at the ice cliff from just below it, I immediately knew how happy I was to have hired a guide (John) rather than attempt the route myself.  Although the ice itself goes at an easy AI3, the exposure below is substantial and the ice itself is far more challenging (i.e. rotten) than anything I’ve previously experienced on weekend ice climbing trips to Lillooet.  The total route length from our bottom belay to a safe belay stance atop the ice cliff is probably about 65m, and if you’re willing to stretch the rope could probably be done (just) in a single long pitch, but we did it as 3 short pitches, which took us approximately 2 hours to fully ascend.

Until this point, we’d had great weather all morning, but shortly after finishing the ice cliff the weather socked in and we ended up with very limited visibility.  Luckily there were some tracks to follow and we made our way up the moderate yet very exposed snowslopes to the final serac band, eventually winding our way up to an anchor station below the final seracs.  Here the normal route trends left, but it turned out that it was a mess of serac to the left, and we ended up having to ascend the steep exposed snowslopes to the right of the seracs which led to the summit plateau across which we wandered, eventually reaching the main summit of Mt. Baker (Grant Peak) just past 2pm.  It was an exhausting but totally exhilarating climb and I was very happy that from this point back to our camp we just had to descend the easy Coleman-Deming route that we’d already done years ago.

On the descent, the Roman Wall was a complete mess of mush.  I was postholing on most steps past my knees (although one of the deeper post-holes turned out to be straight into a small crevasse high on the wall) and although it seemed like it was taking forever, we eventually reached the saddle between Mt. Baker and Colfax Peak and were greatly relieved that the snow on the Coleman Glacier was in much, much better shape for the final descent down to our camp.  We finally reached our tents a bit past 5pm, totally tired, and happy that we’d decided to stay in camp one more night and not push on to the cars.  In camp we settled down to relax, dry our soggy feet, and enjoy another great dinner and eventually headed to bed at a much more reasonable hour than the night before.

Saturday night we had a lazy morning in camp eating a delicious breakfast of pound cake and jam (try it!) and eventually set out for the cars at around 9:30.  The hike out was uneventful except for running into a number of groups of friends heading up for a day or weekend of skiing on the glacier, and a bit past 11 we were back at the cars where we sorted out the group gear again, said goodbye to John, and left Mt. Baker once again for a big meal down at the North Fork Beer Shrine!

In all, this was a fantastic trip, one that I’ll always remember.  Mt. Baker’s ridge was a much more difficult route than I expected it to be.  I always knew that the ice step would be a challenge, but I didn’t realize how full on the rest of the mountaineering would be, and in the end, it stands out as the most difficult snow/ice mountaineering route that I’ve ever done by a good margin.  To finish off this trip report, thank you once again to John and Mt. Baker Mountain Guides for their outstanding service.  We couldn’t have done this trip without you!

Continue ReadingMt. Baker North Ridge

Silverdaisy Mountain (2015)

Date: April 26, 2015

Participants: Brittany Zenger, Geoff Zenger

Difficulty: 1

Report: Silverdaisy attempt #2!  We tried skiing Silverdaisy just after new years a few years ago but it had snowed heavily in the few days before our trip and we ran out of time after slogging up the old mining/logging road from Cayuse Flats.  This time we’d be much more successful ascending from the other side

We arrived at the Sumallo Grove parking lot at about 9am and 10 minutes later were on our way.  We were a bit worried about recent snowfall and whether the trail through the forest would be followable, but it turns out that the trail is well defined (generally on an old double-track path) and well marked and we had no problems following it even once we encountered deep snow at about 1400m.  The trail is a starting to get quick a bit of deadfall on it, especially lower down so if anyone wants to organize a trail clearing day this fall and is wondering where to go, keep the Silverdaisy trail in mind.

Leaving the car at 9:10, it was a bit under 20 minutes to the Silverdaisy trail turnoff.  The trail switchbacks steeply up the side of the mountain before easing off slightly as it heads into the long valley splitting Silverdaisy and Hatchethead.  It wasn’t long after entering the valley that we first encountered snow, at first a little and soon a lot.  There were a few places we had to look around to find the flagging early on, but the trail quickly reaches an old road, at which point it’s obvious where to go to ascent to the col between Silverdaisy and Claimstake mountain.  About 200m below the col the snow became extremely mushy and we put on snowshoes to ease the ascent.  Looking over at Claimstake/Hatchethead on the ascent, it looks like in the winter there could be some really nice ski lines available.

Total time to the col: 4 hours.  From the col it’s an easy broad ridge ascent through sub-alpine terrain to the summit and we had a great day for it.  Light overcast, cool, completely clear views.  Ascending the ridge took nearly exactly an hour, and at about a quarter past 2 we were on the summit, gazing at the views of Hozameen, Silvertip, Frosty, Brice and Outram.  Brice in particular looked like it’d have some fantastic winter ice lines on it for the hardcore crowd.

We didn’t linger long on the summit because the wind picked up, and headed off down the snow.  Descending the snow was no problem at all and very fast.  The trail out was a real slog once the snow ended, but easy enough, and we made it back to the parking lot right at 6 o’clock, for a total round trip time of just a bit under 9 hours.  I probably wouldn’t spend a summer day on this hike when there are more exciting ones to do, but for an early season ascent, this was a great trip!

P.S. I found out that on the same day we did Silverdaisy, another party took the same trail up but cut off of it to do a traverse of Hatchethead and Claimstake mountains, descending to the Silverdaisy-Claimstake col, and then back down to the cars… an idea for next year?


Continue ReadingSilverdaisy Mountain (2015)

Metal Dome

Date: May 2, 2015

Participants: Devin Erickson, Brittany Zenger, Geoff Zenger

Difficulty: 1/2

Report: Metal Dome is a popular mountain so I don’t need to say too much.  We started out from the cars at around 9:30, parking right next to the snowmobile cabin up Brandywine FSR.  Hit snow about 5 minutes up the snowmobile access cut from there, and proceeded easily on snow to the summit.  Amazing views, great day.  Total round trip at a very relaxed pace with lots of time on the summit of only about 5 hours.  Great trip for beginners!

Continue ReadingMetal Dome

Needles Traverse (N to S)

Date: May 9, 2015

Participants: Ed Zenger, Geoff Zenger

Difficulty: 3 (some scrambling, steep bush)

Report: For a few years now I’ve had the idea that I want to knock off all of the north shore peaks listed in Fairley’s guidebook, and one of the closest set of peaks to Vancouver that I hadn’t previously ascended were the Needles, the 3 summits on Lynn ridge lying between Lynn peak and Coliseum mountain.  The needles are visible from much of the lower mainland, and don’t look like much, but a traverse of the Needles and Lynn ridge makes for a full day adventure, only minutes from the city.

Note: If you’re wanting to just go and bag the highest Needle (the middle), by FAR the most efficient route would be to bike up the Seymour river and take the Hydraulic Creek trail up to the South Needle and then scramble over to the Middle Needle (many people will want a rope to descend the South to the Middle needle col) and then reverse the route after bagging the summit.  We didn’t do this because a traverse just sounds more exciting!

We set out from the regular Lynn Headwaters park trailhead at 8:30 towards Norvan falls, which was the usual trudge taking a bit under an hour and a half, and from there went up the Coliseum trail.  I’ve only gone up Coliseum from the other side before so it was interesting to see that the Norvan side isn’t really that much less steep for the first bit, although it does fairly quickly (after about 30 minutes) level off as it starts traversing into the broad bowl between Coliseum and the Needles.

At approximately 800m (or perhaps just below), just under an hour after starting up from Norvan falls, the trail enters the bottom a large open slope, just to the north of the North Needle, with a steep narrow gully visible in the top right corner of the bowl above.  The ridge from the north needle to where the ridge hits the Coliseum trail is reportedly simply awful, and so rather than do the full ridge, we bushwhacked up this bowl towards the gully on the upper right (generally able to stay on boulders but some bush), and approximately 100m to the left of the upper right gully found an easy dirt slope that led up to the ridge.  On this slope we hit our first flagging tape of the day.

Note: If you’re doing the traverse in the other direction, at the first minor col north of the north needle, look for occasional flagging tape heading down to your left towards the Norvan trail.  It is probably hard to follow as it’s a little spaced, but this is your best option to get off the ridge.

The ridge up to the north needle was bushy, but otherwise no problem, and we were quickly on top, approximately 4 hours from starting at the car.  The views were great and we had a quick bite to eat before descending the ridge and going up the middle needle.  There’s a small amount of bushy, minor exposed scrambling heading up to the middle needle, but nothing bad, and on top we had our main lunch for the day.  Right on the flat summits of these two needles was the only snow of the day, just a few inches of mush.

Descending the middle needle you lose a lot of elevation into the steep col between it and the south needle, and here you encounter the only real difficulty of the day, a choice between some extremely steep bush on the right or a short (10m) 3rd class slab that was wet.  Going up was no problem, but I would imagine that many people would want a hand line or rappel to get down if doing the traverse the other way.

From the south needle onwards there’s a well defined trail, presumably to the popularity of the Hydraulic Creek trail build approximately 10 years ago.  We, however, did not take that trail as our car was down at the Lynn Headwaters parking lot, and continued past the Hydraulic Creek trail junction along the ridge.  This part of the ridge is full of ups and downs and is boring, boring, boring until the Lynn peak viewpoint, after which it is all downhill on a tedious old rocky skid track.

I wouldn’t do the traverse again unless someone built a proper trail due to the bushiness in places, but it was a very full day with lots of adventure and aside from the last couple hours of the trip was actually a lot of fun.  Total time required: 9.5 hours, total distance just under 19.6km, and total elevation gain slightly over 1900m!

Last word: Should I do the traverse N -> S or S -> N?  I would highly recommend doing the traverse N -> S instead of the other way around because from below it’s easy to see how to shortcut onto the ridge at the right place (so fewer route finding difficulties), the 2 scrambling steps are done going up instead of descending them, and because the toughest parts of the day are done early on when you’re fresh instead of at the end of the day.

GPS Track: Link to KMZ

Needles route

Continue ReadingNeedles Traverse (N to S)

Mt. Baird

Date: March 8, 2015

Participants: Dylan, Martin, Brittany Zenger, Ed Zenger, Geoff Zenger

Difficulty: 2

Report: A trip report on clubtread of a visit to Mt. Baird in the waning days of February spurred my interest to visit this rarely climbed peak near Hope.  The previous weekend I’d been exploring the roads on the east side of Harrison Lake (long story short, the road to Nahatlatch is washed out just 4km from Nahatlatch) and had tried to approach the Old Settler from the east, but no luck.  This weekend I’d be able to climb Mt. Baird and get good views of the Old Settler from the south east.  The forecast was looking good and a last minute trip posting on the BCMC website managed to fill up my Jeep for the excursion.

We met up at Columbia Station in New West at 7:30 and made our way out to Hope.  The access to Mt. Baird is easy right now via Nickelmine Road which if you follow it is well maintained for by both a local offroad association and for active logging and leads into Emory Creek.   We parked right next to the turn off for spur 3569 (just a bit past the 11 km marker), walked up the short spur, and then ducked into the trees.  We found ourselves on the left side of a creek, and made our way up the left side of the creek through open easy forest all the way up to treeline.  This appears to be the ideal route up the mountain.

We hit snow around 1200m, and by 1400m were on a long ridge heading up towards the summit.  At about 1400m there are some bluffs and we chose to head around them to the left, which we did and followed some snow filled gullies up towards the obvious broad snowslope leading up towards the left of the main summit.  It was a reasonable route, but on the way down we came down the other side (climber’s right) and found it to be even easier going and more straightforward.  The snow leading up to the summit was very pleasant and enjoyable, and at a quarter to 1, less than 4 hours after leaving the cars, we found ourselves on the small rocky summit of Mt. Baird.

The views from the top of the Old Settler were grand as expected, but what was unexpected was the fantastic views of so much more.  From the summit there are great views of the Anderson River group, Needle Peak, Cheam Range, Judge Howay area, Baker area, and even the Outram and Silvertip regions of Manning Park!

We spent a good long time on the summit in the unseasonably warm temperatures before eventually making our way back down to the car.  The descent on the snow was fast and descent through the trees was easy and quick as well, and we made the descent in well under 2 hours.

Thank you to everyone for the great company and great trip.  You need a low snow year like this year, but if you’re able to drive to at least 800m on the logging road, Mt. Baird makes for a great early season or winter trip!

Continue ReadingMt. Baird