Tomyhoi Peak

Date: June 27, 2015

Participants: Alex Le, Geoff Zenger

Difficulty: 3 (solid 3rd, some exposure, never exceeding 3rd)

Report: Saturday was forecast to be the hottest day of the year… what could be a better idea than to do a long day hike with plenty of elevation gain to a beautiful scramble?  Apparently we were the only people who thought this way, as the crowds that I expected to see up at Yellow Aster Butte and Tomyhoi Peak never materialized.  Tomyhoi was one of the remaining “3 star” Matt Gunn routes that I hadn’t climbed, and aside from severe water loss due to the incredible heat (I went through 5 litres of water and was still dehydrated), we had an amazing day.  Tomyhoi is a great scramble in a gorgeous area.

A few delays led us to not leave my place in New West until about 7:20am, and this meant that by the time we hit the border crossing, the line was long (45 minutes), and so we didn’t make it to the Yellow Aster Butte trailhead until nearly 10 o’clock.  Note that the Twin Lakes road has degraded somewhat from the “excellent 2wd” condition described in Gunn’s book.  It could probably be done in most 2wd vehicles, but a few rough sections could make some people being uncomfortable and I was happy to have brought my Jeep.

We set out from the trailhead at about 10 and the day was already terribly hot.  The switchbacks up the initial slope went quick enough, although we had some confusion before the turn off to yellow aster butte.  The guidebook says to “look for a trail that goes off to the left” and at one point we thought we saw a trail heading left, but it turned out to just be a minor spur to a campsite.  The actual trail to yellow aster butte is very well marked with a big sign and obvious when you get there, just minutes before the trail reaches the pass at the end of the valley.  From the turnoff, it was quick going on the traverse to yellow aster butte, and just as we crested the knoll where you see the route down to the tarns and the ridge leading to Tomyhoi itself, it was apparent how amazing the views on the trip were going to be.

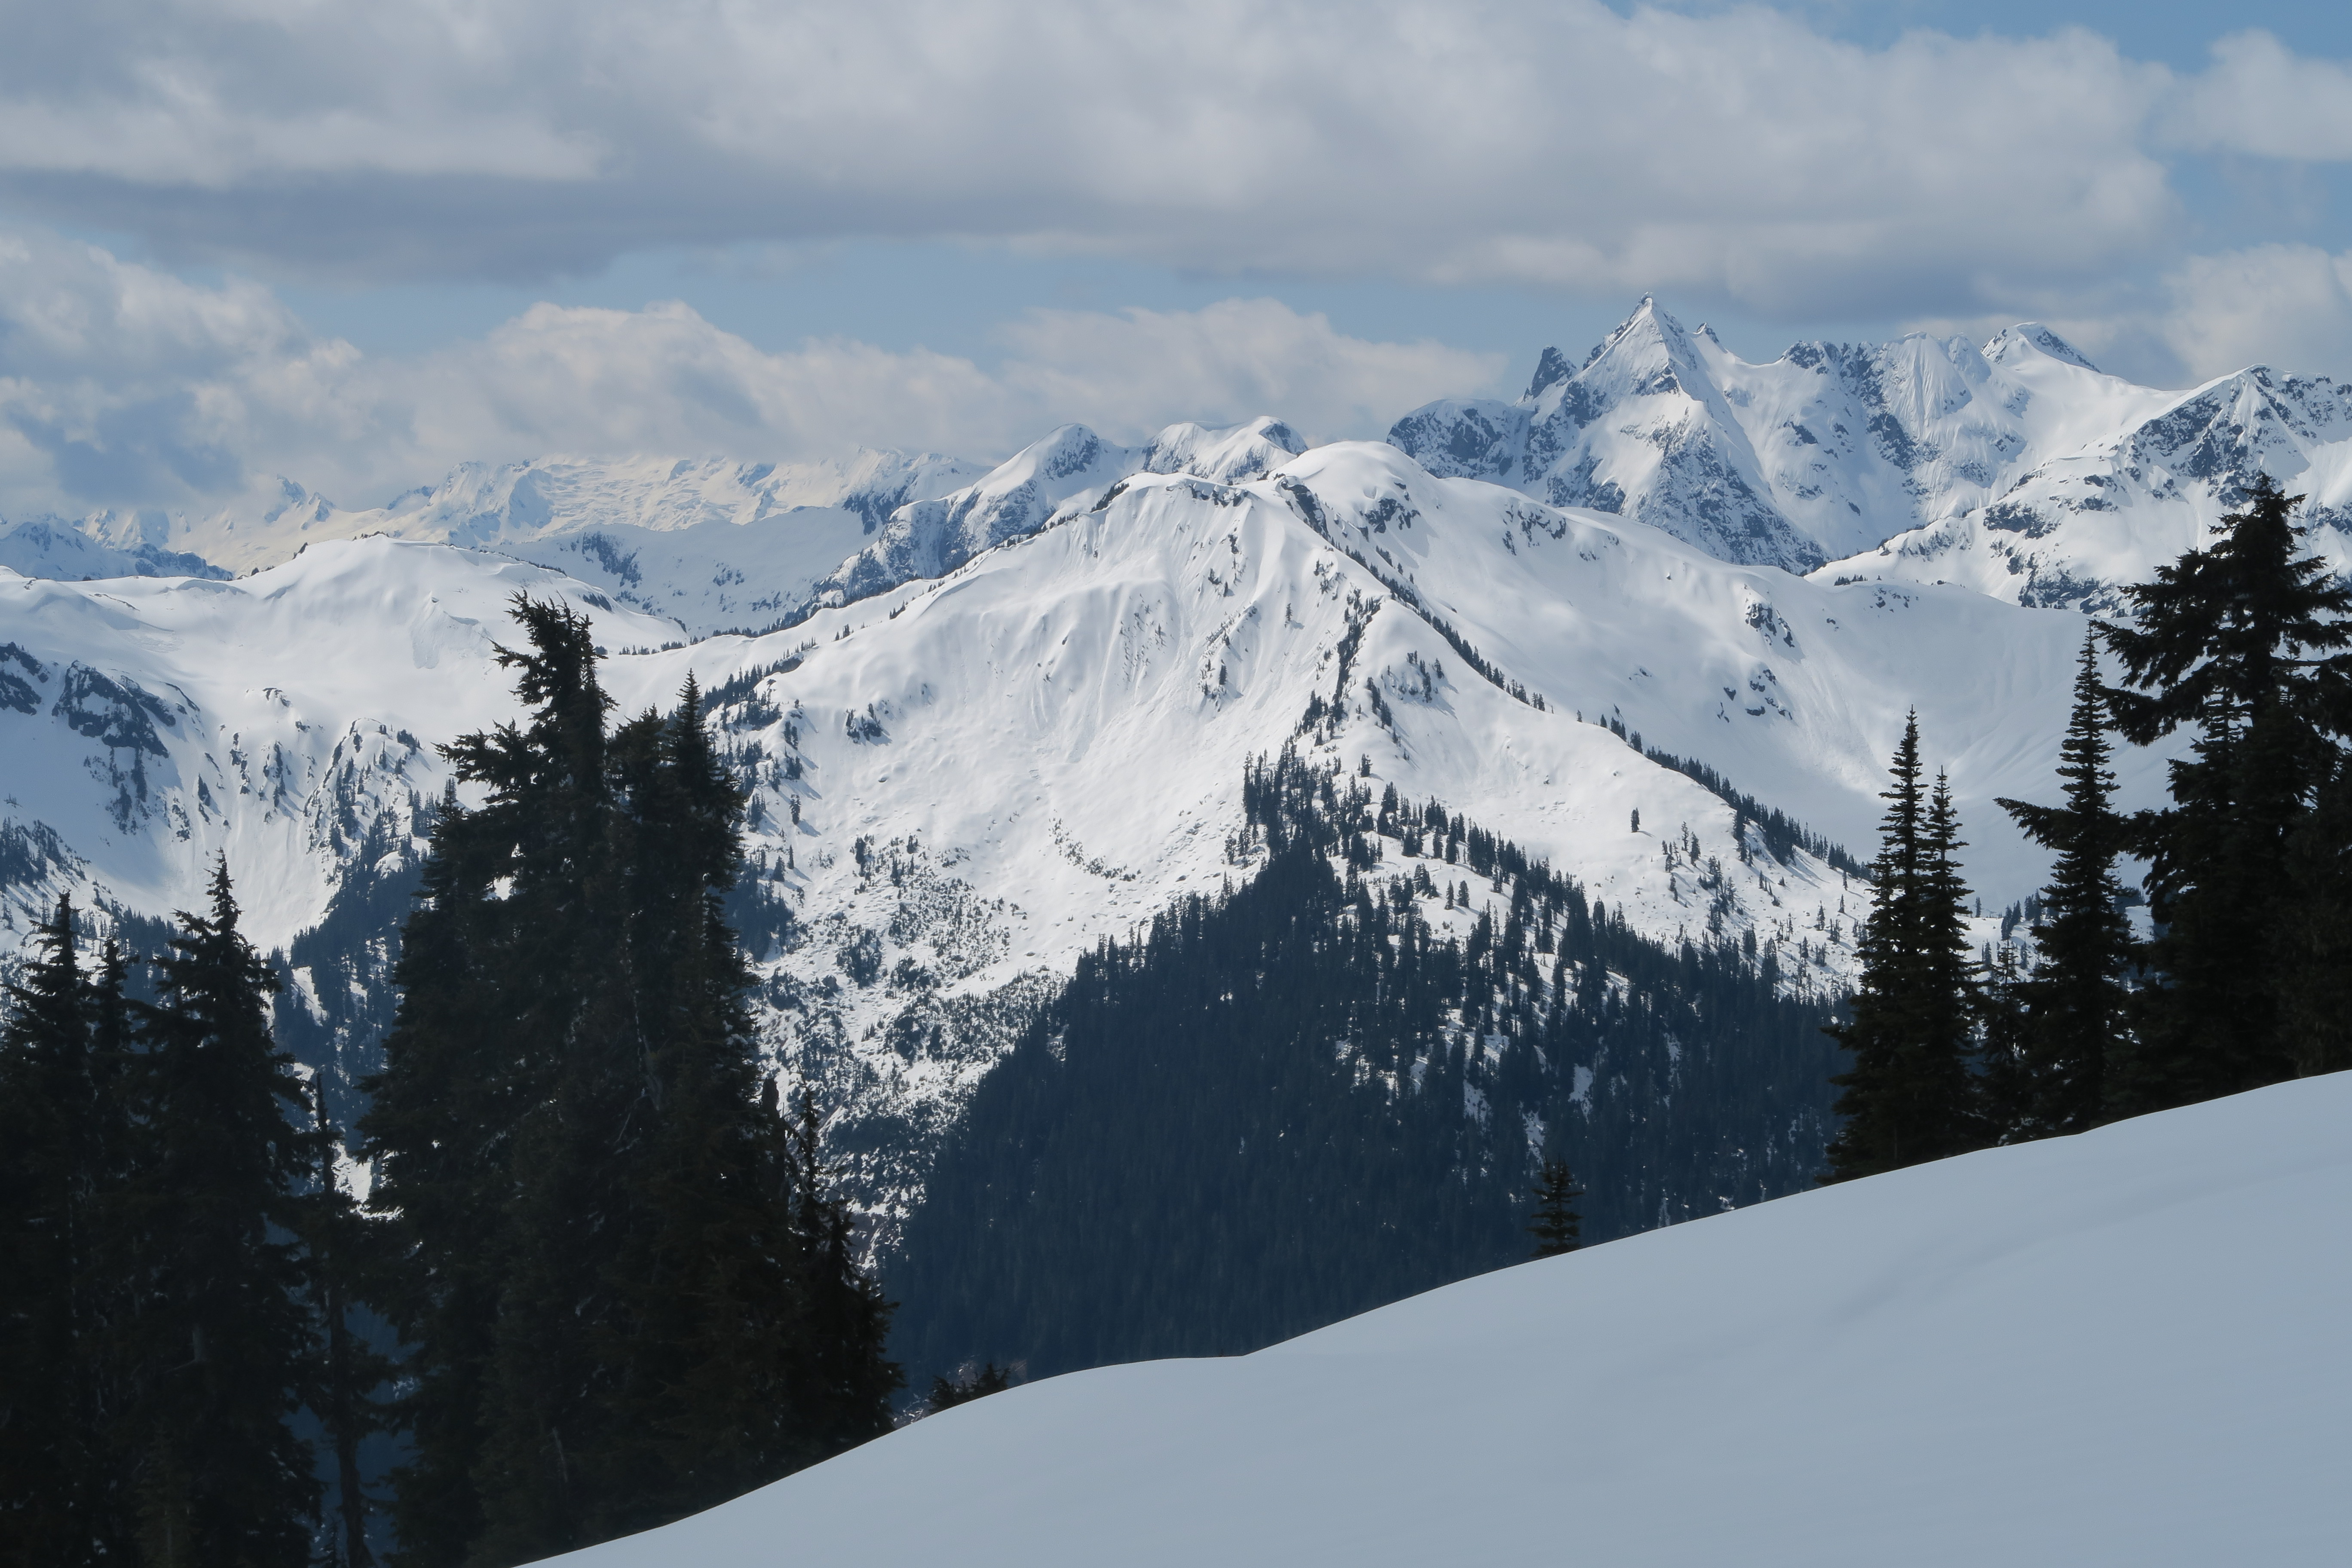
From this knoll there are amazing views of Shuksan and Baker, and the ridge from here down to the tarns and up towards Tomyhoi are extremely pleasant and varied.  It took us a bit under 2 hours to the tarns where we had lunch, and from there about 2 hours to wander up the ridge (pushing the pace, really) to the subsummit (with a bit of annoying up and down along the way).  The subsummit is quite nice, but from there the true summit looks very intimidating!

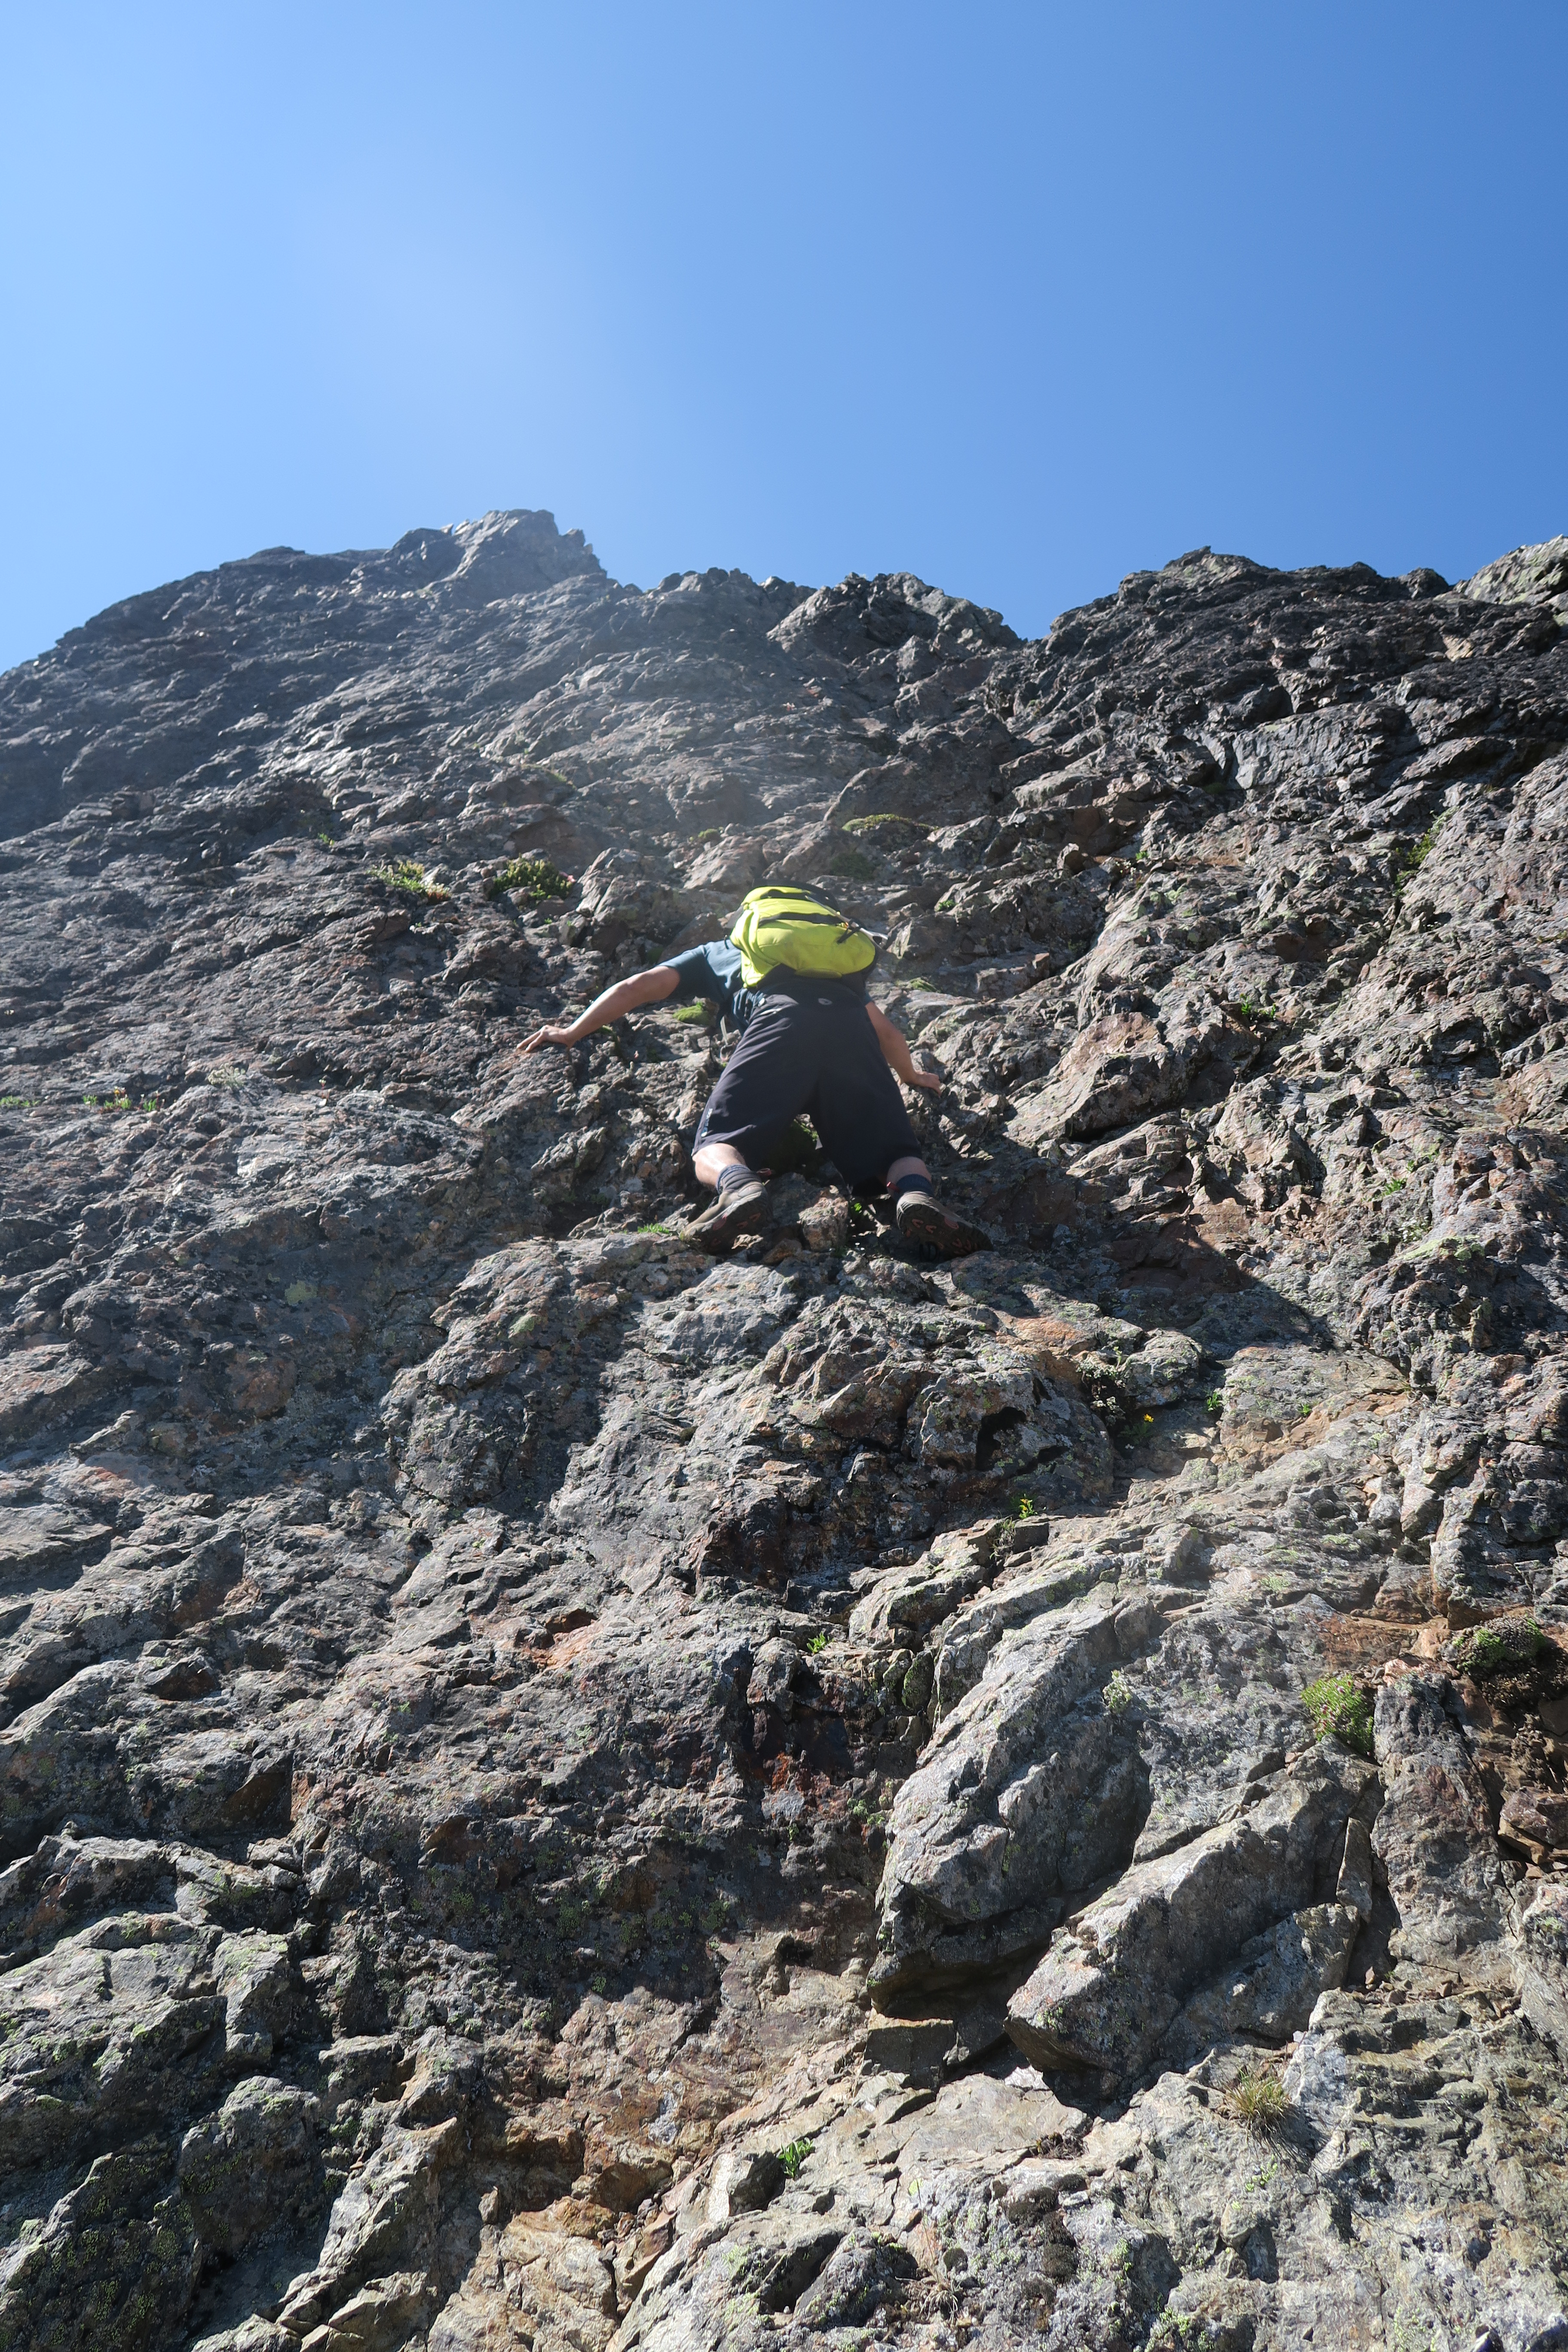
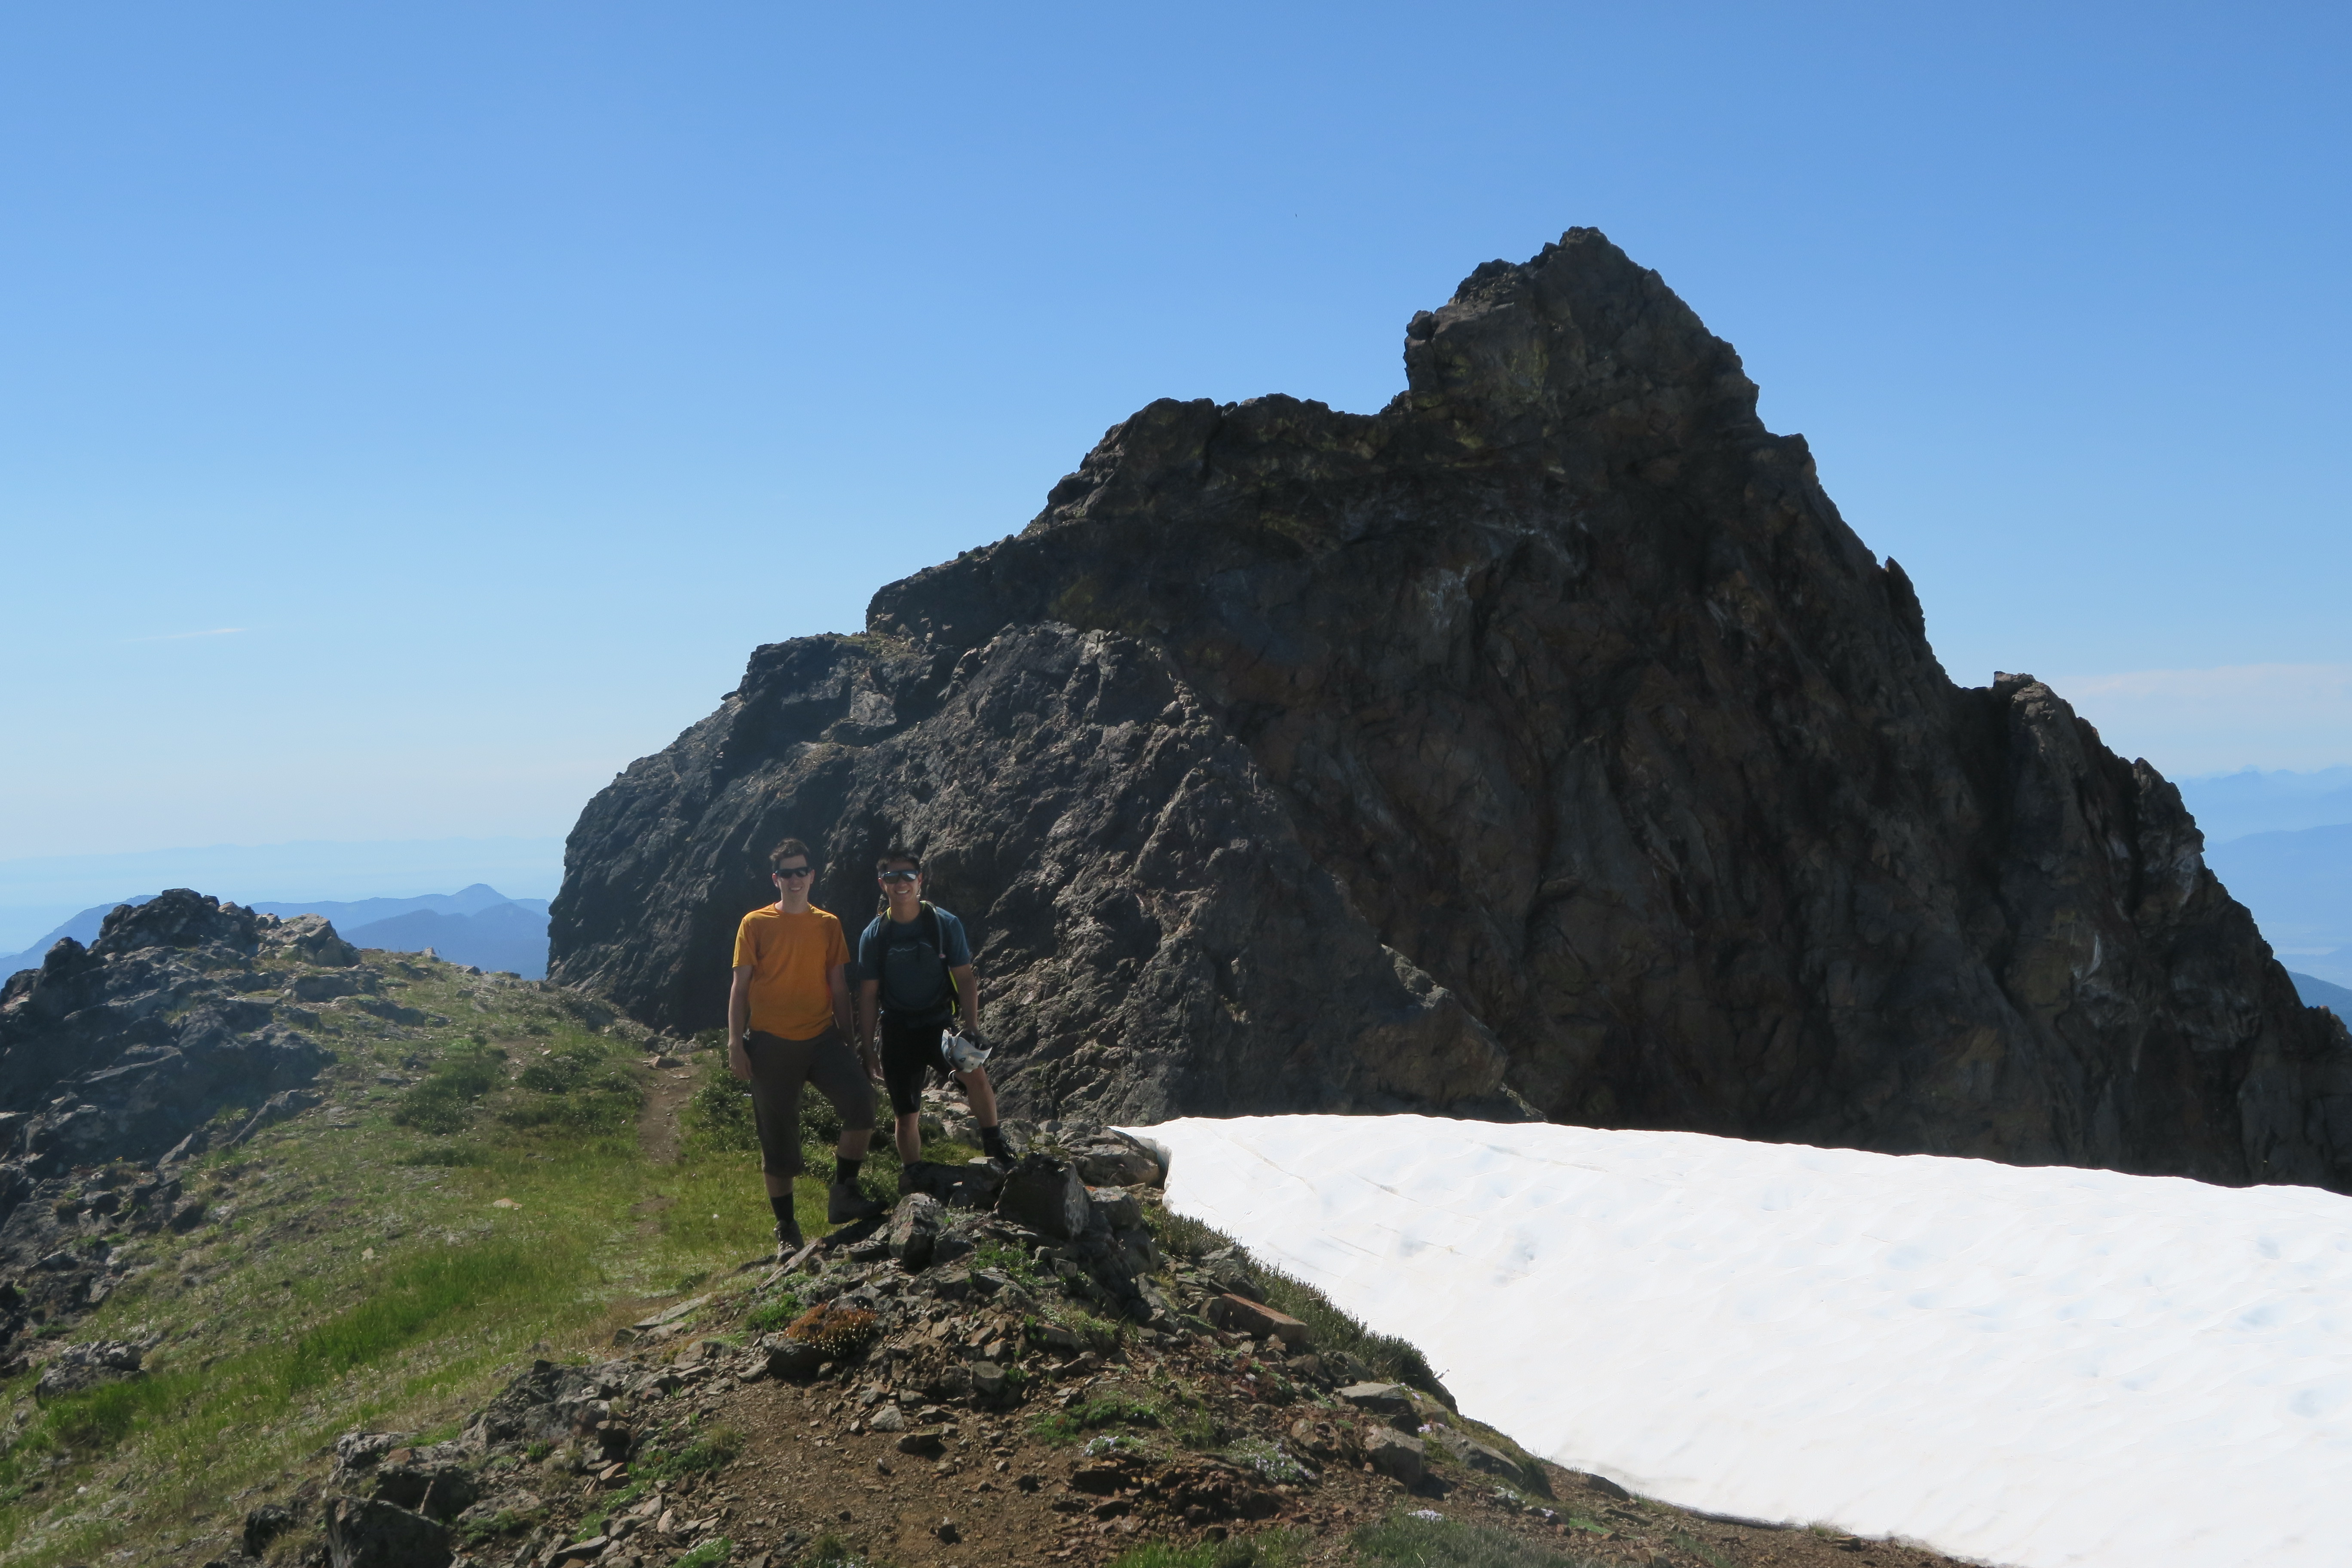
We scrambled down loose ledges to the col between the subsummit and true summit to get a look, and fortunately from the bottom it doesn’t really look so bad.  There’s a groove up to the left, then one from there up to the right, and it’s only from the top of that groove to the top of the ridge (perhaps 8m total) that the going gets quite difficult with decent exposure.  Luckily, this hard part is on the most solid rock of the day and neither of us had trouble ascending it.  For comparison, I’d say that the route is comparable to Sky Pilot, although probably a little easier.  Above this crux, the summit was easy to attain and although it’s a tiny summit, the views from the top were great, with plenty to see in both the US and Canada.  Total ascent time: 4 hours, 45 minutes.  Total water consumed on ascent: 3 litres.

The descent through the scrambling part was challenging for Alex as it was his first true scramble route, but with a bit of guidance and coaching he made it down safely and without too many frayed nerves.  From the subsummit down to the tarns went quickly even though the temperature was still scorching, but a quick dip in the tarns cooled us down and from there it was a tedious and tiring descent back to the car for a total round trip time of about 8 hours, 30 minutes.

In all, Tomyhoi is a fantastic trip and well deserving of the 3 stars that Gunn gave it in his guidebook.  You spend very little time in the trees, so almost the entire ascent is through the alpine, and the trip has plenty of variety including places requiring routefinding and a really nice scramble to top it off!  Sure, I went sweated out at least 6 litres of water over the course of the day, but that just meant that we were lucky enough to be up there on a day where we could have it all to ourselves!

Continue ReadingTomyhoi Peak

Mt. Baker North Ridge

Date: May 28-30, 2015

Participants: Brittany Zenger, Geoff Zenger, John Minier (guide)

Difficulty: 5 (snow and glacier ice to 70 degrees)

Report: As you drive along the Trans Canada Highway from Vancouver to Hope, when you’re passing through Abbotsford Mt. Baker dominates the horizon, and straight in the centre of your view is Mt. Baker’s North Ridge.  This frequent view, combined with both Alpine Select and Beckey’s guide to the North Cascades calling the North Ridge a classic must-do route had led me to gaze at the route for the past few years and want to climb it and return once again to Mt. Baker.

Prior to this trip, we’d only climbed with a guide once before, but given the described difficulty of the North Ridge (extensive climbing on exposed 45+ degree snow slopes and a 30-40m 70 degree ice wall) I sought out a guide to lead us up the route.  I ended up booking John Minier through Mt. Baker Mountain Guides for our wedding anniversary and we lucked out as he is a great guide!  If you’re looking to climb something in the North Cascades I highly recommend checking him and his guiding service out.  They were very helpful in arranging the trip, and he was a great guy to spend 3 days with (even cooked us delicious breakfasts and dinners!).

We began our trip meeting at 7:30 Thursday morning at the Glacier public service centre for a gear check and to divide up our group gear, and once that was done and we’d picked up a hot drink from one of Glacier’s coffee shops we headed up to the Heliotrope Ridge parking lot.  The trudge up to Hogsback was the usual one, but the trail is in good shape, and although the upper rock was already full with a large party, we found a couple nice tent platforms not far below it on a dry rib and were able to set up camp off the snow and on dry land.  Here we had a relaxed afternoon, did an hour or two of mountaineering practice (ice axe arrest, short roping technique, etc), had a tasty dinner, and headed to bed just past 7 for an early rise the next day.

John woke us up at the unholy hour of 2am, and after choking down a few mouthfuls of oatmeal and suiting up, we were set to head out to Mt. Baker’s north ridge by 3:30am.  It took us about two and a half hours to climb up to the Coleman glacier and cross it to the start of the north ridge.  If you look at the route description for the north ridge in Alpine Select, you’ll notice that it suggests two routes: an easier route by going around the ridge to the Roosevelt Glacier and up to the ridge from there or a steeper route straight up through the “hourglass” from the Coleman Glacier, and we took neither.  The Roosevelt Glacier is currently blocked by large crevasses, and the hourglass has a large crevasse blocking all progress.  Instead, we crossed a bergschrund and ascended snowslope about 100m to the left of the hourglass and after two short pitches on steep snow, short-roped the traverse over to the top of the hourglass and from there up to the ridge proper.  On the ridge itself we took a break before ascending up moderate snow slopes to the base of the infamous ice cliff, which we reached at about a quarter to 9.

Looking up at the ice cliff from just below it, I immediately knew how happy I was to have hired a guide (John) rather than attempt the route myself.  Although the ice itself goes at an easy AI3, the exposure below is substantial and the ice itself is far more challenging (i.e. rotten) than anything I’ve previously experienced on weekend ice climbing trips to Lillooet.  The total route length from our bottom belay to a safe belay stance atop the ice cliff is probably about 65m, and if you’re willing to stretch the rope could probably be done (just) in a single long pitch, but we did it as 3 short pitches, which took us approximately 2 hours to fully ascend.

Until this point, we’d had great weather all morning, but shortly after finishing the ice cliff the weather socked in and we ended up with very limited visibility.  Luckily there were some tracks to follow and we made our way up the moderate yet very exposed snowslopes to the final serac band, eventually winding our way up to an anchor station below the final seracs.  Here the normal route trends left, but it turned out that it was a mess of serac to the left, and we ended up having to ascend the steep exposed snowslopes to the right of the seracs which led to the summit plateau across which we wandered, eventually reaching the main summit of Mt. Baker (Grant Peak) just past 2pm.  It was an exhausting but totally exhilarating climb and I was very happy that from this point back to our camp we just had to descend the easy Coleman-Deming route that we’d already done years ago.

On the descent, the Roman Wall was a complete mess of mush.  I was postholing on most steps past my knees (although one of the deeper post-holes turned out to be straight into a small crevasse high on the wall) and although it seemed like it was taking forever, we eventually reached the saddle between Mt. Baker and Colfax Peak and were greatly relieved that the snow on the Coleman Glacier was in much, much better shape for the final descent down to our camp.  We finally reached our tents a bit past 5pm, totally tired, and happy that we’d decided to stay in camp one more night and not push on to the cars.  In camp we settled down to relax, dry our soggy feet, and enjoy another great dinner and eventually headed to bed at a much more reasonable hour than the night before.

Saturday night we had a lazy morning in camp eating a delicious breakfast of pound cake and jam (try it!) and eventually set out for the cars at around 9:30.  The hike out was uneventful except for running into a number of groups of friends heading up for a day or weekend of skiing on the glacier, and a bit past 11 we were back at the cars where we sorted out the group gear again, said goodbye to John, and left Mt. Baker once again for a big meal down at the North Fork Beer Shrine!

In all, this was a fantastic trip, one that I’ll always remember.  Mt. Baker’s ridge was a much more difficult route than I expected it to be.  I always knew that the ice step would be a challenge, but I didn’t realize how full on the rest of the mountaineering would be, and in the end, it stands out as the most difficult snow/ice mountaineering route that I’ve ever done by a good margin.  To finish off this trip report, thank you once again to John and Mt. Baker Mountain Guides for their outstanding service.  We couldn’t have done this trip without you!

Continue ReadingMt. Baker North Ridge

Silverdaisy Mountain (2015)

Date: April 26, 2015

Participants: Brittany Zenger, Geoff Zenger

Difficulty: 1

Report: Silverdaisy attempt #2!  We tried skiing Silverdaisy just after new years a few years ago but it had snowed heavily in the few days before our trip and we ran out of time after slogging up the old mining/logging road from Cayuse Flats.  This time we’d be much more successful ascending from the other side

We arrived at the Sumallo Grove parking lot at about 9am and 10 minutes later were on our way.  We were a bit worried about recent snowfall and whether the trail through the forest would be followable, but it turns out that the trail is well defined (generally on an old double-track path) and well marked and we had no problems following it even once we encountered deep snow at about 1400m.  The trail is a starting to get quick a bit of deadfall on it, especially lower down so if anyone wants to organize a trail clearing day this fall and is wondering where to go, keep the Silverdaisy trail in mind.

Leaving the car at 9:10, it was a bit under 20 minutes to the Silverdaisy trail turnoff.  The trail switchbacks steeply up the side of the mountain before easing off slightly as it heads into the long valley splitting Silverdaisy and Hatchethead.  It wasn’t long after entering the valley that we first encountered snow, at first a little and soon a lot.  There were a few places we had to look around to find the flagging early on, but the trail quickly reaches an old road, at which point it’s obvious where to go to ascent to the col between Silverdaisy and Claimstake mountain.  About 200m below the col the snow became extremely mushy and we put on snowshoes to ease the ascent.  Looking over at Claimstake/Hatchethead on the ascent, it looks like in the winter there could be some really nice ski lines available.

Total time to the col: 4 hours.  From the col it’s an easy broad ridge ascent through sub-alpine terrain to the summit and we had a great day for it.  Light overcast, cool, completely clear views.  Ascending the ridge took nearly exactly an hour, and at about a quarter past 2 we were on the summit, gazing at the views of Hozameen, Silvertip, Frosty, Brice and Outram.  Brice in particular looked like it’d have some fantastic winter ice lines on it for the hardcore crowd.

We didn’t linger long on the summit because the wind picked up, and headed off down the snow.  Descending the snow was no problem at all and very fast.  The trail out was a real slog once the snow ended, but easy enough, and we made it back to the parking lot right at 6 o’clock, for a total round trip time of just a bit under 9 hours.  I probably wouldn’t spend a summer day on this hike when there are more exciting ones to do, but for an early season ascent, this was a great trip!

P.S. I found out that on the same day we did Silverdaisy, another party took the same trail up but cut off of it to do a traverse of Hatchethead and Claimstake mountains, descending to the Silverdaisy-Claimstake col, and then back down to the cars… an idea for next year?


Continue ReadingSilverdaisy Mountain (2015)

Metal Dome

Date: May 2, 2015

Participants: Devin Erickson, Brittany Zenger, Geoff Zenger

Difficulty: 1/2

Report: Metal Dome is a popular mountain so I don’t need to say too much.  We started out from the cars at around 9:30, parking right next to the snowmobile cabin up Brandywine FSR.  Hit snow about 5 minutes up the snowmobile access cut from there, and proceeded easily on snow to the summit.  Amazing views, great day.  Total round trip at a very relaxed pace with lots of time on the summit of only about 5 hours.  Great trip for beginners!

Continue ReadingMetal Dome

Needles Traverse (N to S)

Date: May 9, 2015

Participants: Ed Zenger, Geoff Zenger

Difficulty: 3 (some scrambling, steep bush)

Report: For a few years now I’ve had the idea that I want to knock off all of the north shore peaks listed in Fairley’s guidebook, and one of the closest set of peaks to Vancouver that I hadn’t previously ascended were the Needles, the 3 summits on Lynn ridge lying between Lynn peak and Coliseum mountain.  The needles are visible from much of the lower mainland, and don’t look like much, but a traverse of the Needles and Lynn ridge makes for a full day adventure, only minutes from the city.

Note: If you’re wanting to just go and bag the highest Needle (the middle), by FAR the most efficient route would be to bike up the Seymour river and take the Hydraulic Creek trail up to the South Needle and then scramble over to the Middle Needle (many people will want a rope to descend the South to the Middle needle col) and then reverse the route after bagging the summit.  We didn’t do this because a traverse just sounds more exciting!

We set out from the regular Lynn Headwaters park trailhead at 8:30 towards Norvan falls, which was the usual trudge taking a bit under an hour and a half, and from there went up the Coliseum trail.  I’ve only gone up Coliseum from the other side before so it was interesting to see that the Norvan side isn’t really that much less steep for the first bit, although it does fairly quickly (after about 30 minutes) level off as it starts traversing into the broad bowl between Coliseum and the Needles.

At approximately 800m (or perhaps just below), just under an hour after starting up from Norvan falls, the trail enters the bottom a large open slope, just to the north of the North Needle, with a steep narrow gully visible in the top right corner of the bowl above.  The ridge from the north needle to where the ridge hits the Coliseum trail is reportedly simply awful, and so rather than do the full ridge, we bushwhacked up this bowl towards the gully on the upper right (generally able to stay on boulders but some bush), and approximately 100m to the left of the upper right gully found an easy dirt slope that led up to the ridge.  On this slope we hit our first flagging tape of the day.

Note: If you’re doing the traverse in the other direction, at the first minor col north of the north needle, look for occasional flagging tape heading down to your left towards the Norvan trail.  It is probably hard to follow as it’s a little spaced, but this is your best option to get off the ridge.

The ridge up to the north needle was bushy, but otherwise no problem, and we were quickly on top, approximately 4 hours from starting at the car.  The views were great and we had a quick bite to eat before descending the ridge and going up the middle needle.  There’s a small amount of bushy, minor exposed scrambling heading up to the middle needle, but nothing bad, and on top we had our main lunch for the day.  Right on the flat summits of these two needles was the only snow of the day, just a few inches of mush.

Descending the middle needle you lose a lot of elevation into the steep col between it and the south needle, and here you encounter the only real difficulty of the day, a choice between some extremely steep bush on the right or a short (10m) 3rd class slab that was wet.  Going up was no problem, but I would imagine that many people would want a hand line or rappel to get down if doing the traverse the other way.

From the south needle onwards there’s a well defined trail, presumably to the popularity of the Hydraulic Creek trail build approximately 10 years ago.  We, however, did not take that trail as our car was down at the Lynn Headwaters parking lot, and continued past the Hydraulic Creek trail junction along the ridge.  This part of the ridge is full of ups and downs and is boring, boring, boring until the Lynn peak viewpoint, after which it is all downhill on a tedious old rocky skid track.

I wouldn’t do the traverse again unless someone built a proper trail due to the bushiness in places, but it was a very full day with lots of adventure and aside from the last couple hours of the trip was actually a lot of fun.  Total time required: 9.5 hours, total distance just under 19.6km, and total elevation gain slightly over 1900m!

Last word: Should I do the traverse N -> S or S -> N?  I would highly recommend doing the traverse N -> S instead of the other way around because from below it’s easy to see how to shortcut onto the ridge at the right place (so fewer route finding difficulties), the 2 scrambling steps are done going up instead of descending them, and because the toughest parts of the day are done early on when you’re fresh instead of at the end of the day.

GPS Track: Link to KMZ

Needles route

Continue ReadingNeedles Traverse (N to S)

Mt. Baird

Date: March 8, 2015

Participants: Dylan, Martin, Brittany Zenger, Ed Zenger, Geoff Zenger

Difficulty: 2

Report: A trip report on clubtread of a visit to Mt. Baird in the waning days of February spurred my interest to visit this rarely climbed peak near Hope.  The previous weekend I’d been exploring the roads on the east side of Harrison Lake (long story short, the road to Nahatlatch is washed out just 4km from Nahatlatch) and had tried to approach the Old Settler from the east, but no luck.  This weekend I’d be able to climb Mt. Baird and get good views of the Old Settler from the south east.  The forecast was looking good and a last minute trip posting on the BCMC website managed to fill up my Jeep for the excursion.

We met up at Columbia Station in New West at 7:30 and made our way out to Hope.  The access to Mt. Baird is easy right now via Nickelmine Road which if you follow it is well maintained for by both a local offroad association and for active logging and leads into Emory Creek.   We parked right next to the turn off for spur 3569 (just a bit past the 11 km marker), walked up the short spur, and then ducked into the trees.  We found ourselves on the left side of a creek, and made our way up the left side of the creek through open easy forest all the way up to treeline.  This appears to be the ideal route up the mountain.

We hit snow around 1200m, and by 1400m were on a long ridge heading up towards the summit.  At about 1400m there are some bluffs and we chose to head around them to the left, which we did and followed some snow filled gullies up towards the obvious broad snowslope leading up towards the left of the main summit.  It was a reasonable route, but on the way down we came down the other side (climber’s right) and found it to be even easier going and more straightforward.  The snow leading up to the summit was very pleasant and enjoyable, and at a quarter to 1, less than 4 hours after leaving the cars, we found ourselves on the small rocky summit of Mt. Baird.

The views from the top of the Old Settler were grand as expected, but what was unexpected was the fantastic views of so much more.  From the summit there are great views of the Anderson River group, Needle Peak, Cheam Range, Judge Howay area, Baker area, and even the Outram and Silvertip regions of Manning Park!

We spent a good long time on the summit in the unseasonably warm temperatures before eventually making our way back down to the car.  The descent on the snow was fast and descent through the trees was easy and quick as well, and we made the descent in well under 2 hours.

Thank you to everyone for the great company and great trip.  You need a low snow year like this year, but if you’re able to drive to at least 800m on the logging road, Mt. Baird makes for a great early season or winter trip!

Continue ReadingMt. Baird

Mt. Chief Pascall 2015

Date: Jan 11, 2015

Participants: Brittany Zenger, Ed Zenger, Geoff Zenger, + 4 other BCMC members

Difficulty: 3

Report: Just over three years since my previous trip to Mt. Chief Pascall, I joined Brittany on a BCMC trip that she organized to make a ski ascent and descent of the peak.  We’ve had a bad snow year so far, but the trip was scheduled for a month later in the season than my previous trip and so I was optimistic that there’d be enough snow to avoid any alder bashing and have a decent run down the mountain.  Luckily, someone removed the alder on the lower logging road in the past few years, but as it turned out, there was no good run down to be had.

We met up at 8:15 in Pemberton at the Mt. Currie Coffee Company and headed up to the weather station pull out on the Duffey Lake road and set out from the cars at around 9:30am.  So far, so good.  There wasn’t much snow in the trees and the initial creek crossing was a little interesting, but we made it up to the logging road on the opposite side of the valley without too much drama.  From here we followed the logging road to the east to the far edge of the clearcut and made our way up through the trees on the far side of it as there wasn’t quite enough snow to make it up through the clearcut itself.  The going was slow due to the lack of snow, but we made steady progress up to the ridge.  Unlike last time, we stuck a bit too far to the right of the route indicated on Baldwin’s map, but luckily it worked out in the end.  There is a bit of exposure higher up if you stick too far right and it’s definitely easier to stick to the mellow terrain to the left (i.e. if you hit some cliff bands, you should traverse left, not right), but it turns out that either way works.

Higher up the skinning became decent, and at the top of the run labelled “Equinox” on Baldwin’s map we left our skis behind and booted up to the summit.  We were on the summit some time between 2 and 2:15, which means that the ascent took about 45 minutes longer than on my previous trip to the peak, but conditions were much more challenging this time around.  The views to the north were great but unfortunately the view to the summit of Joffre was clouded in.    Interestingly, this was the same day that 3 deaths occurred in the central couloir Joffre (partly visible from the summit of Chief Pascall) but in the winter silence nothing seemed amiss.

Now… the descent.  The last time I skiied Chief Pascall the descent took approximately 2 hours (perhaps a bit less) and would’ve been much shorter than that except for a group member going off route at one point and everyone having to wait for him to reascend to the correct path.  This time was another story.  The snow was wet heavy cement in places, and icy with fluff underneath in others.  The common element between both conditions was the simple lack of snow all around.  Given the lack of snow on the ascent route we chose to descend via “Equinox” in the hopes that it would save us from some nasty conditions in the trees lower down.  It didn’t.  It probably wouldn’t have been better on the ascent route but the descent down to the logging road was literally the worst skiing I’ve had in my life.  Hard to turn, obstacles everywhere, and impossible to ski in places due to lack of snow, it took us well past dark to make it down to the road, and we didn’t make it to the cars until about 7:20.  The descent took us just shy of 5 hours and we were all exhausted!  Anyways, thank you to everyone for the trip, I’m glad to have been in the area again and for the great company, but I really hope that ski conditions improve soon so that other trips this year actually have some quality skiing, unlike this one.

Continue ReadingMt. Chief Pascall 2015